Showing posts with label decorative tape. Show all posts

Wednesday, July 6, 2016

Attack of the Scrap Monsters!

Scrap monsters have taken over our home!

When I saw Courtney's video for scrap monsters, I had every intention of creating them on my own, and once my kids got a look at them, there was no stopping them from trying their hand at them, too.
First, I created body shapes and face features following Courtney's lead in her YouTube video.
In this totally un-staged photo, you can see the impromptu mess created by the whole process:
My daughters and I chose our favorite body shapes and covered them in decorative tapes, cutting around the edges when we were finished to get a clean edge:
I then followed Courtney's lead and outlined my monster with thick black Sharpie, though my girls declined this step (which was probably for the best, since we're talking about permanent ink here!).
The final step involves finding the face we want to match with our monster's body, and using pencils to add a little color:
Last night, we each created two monsters, for a total of six.  This morning, my girls took over, creating their own body shapes and face features, and creating even more.
They've named each monster, and created a kind of "profile" of their special talents and back stories.  They are most interested in laminating them to create "backpack buddies" (little toys and such that connect to the zippers of their backpacks), but I'm thinking they have a real future in Scrap Monster Trading Cards!  Don't you think?
I think they will make absolutely adorable stickers and journal embellishments.
The Scrap Monsters have taken over, 
and just might need their own room soon!

For more paper projects, check out my Collage and Assemblage and Paper Crafting boards on Pinterest!

Friday, January 30, 2015

This and That: Tape, Paper, Planners....and Jodi Ohl!

In spite of the promises of snow and my lingering cough wreaking havoc on my plans, I've got lots of little things to share!
First, I am the proud new owner of a set of the bright and beautiful washi tape designed by Aimee of Artsyville.  She has decided to "retire" her washi tape project, and offered a "buy one set, get one set" from her Etsy shop, and my awesome Mom gifted me with my very own set of six.  You are likely to see lots of Artsyville washi on my planner and art journaling pages in the coming months!
Aimee is always generous with her hand-lettered goodies, and included this insert with lots of ideas for using her washi tape.  At the rate my collection is growing, I better be getting some of these projects underway!  I have accumulated a LOT more rolls since I showed you my wooden schoolhouse storage solution.
My mother and I are taking full advantage of living close to one another for the first time in almost twenty years.  We both love art-making and paper, paper, paper, so art and crafts stores are dangerous for us!  But now, when we buy a pack of paper, for example, we split it with one another so we can enjoy even more variety.  My mom picked an autumn-themed collection, and I added the papers above to my stash.  My collection was called Mango Frost...gorgeous!
We used our new paper to work on a project I've been wanting to try since Cloth Paper Scissors published the article, "Folder Journal:  Making Art From Office Supplies," in one of their 2011 issues.
I think I want to add some additional papers to mine--maybe some text pages and vintage images--but for now, here is the booklet I crafted from a common office file folder:
Front

First inside spread

Second inside spread

Back
I am such a HUGE fan of stitched paper, and I love that this project had me stitching front and back sides with no concern for the backsides of the stitching showing.  By using the Mango Frost paper selection, I had guaranteed color cohesiveness...so much easier than digging through my paper collection hoping my colors and patterns don't clash!
Finally, I've been continuing my efforts to perk up my planner pages to add some fun to the mundane task of keeping my time organized.  Remember the empty little planner spread awaiting the beginning of a new week?
Well, this is one example of how the embellishing happens over the course of a week:
The stickers, the tape, the clip art, the quotations, the comments about my day, the sticky notes--they all make it that much more interesting to keep track of my days.
A great simple quotation from MLK, Jr.

As this week draws to a close, here's the spread that has been growing over the past five days:
Since I don't maintain a daily art journal, this is a simple fun way to infuse a little color and creativity into my life when I don't have time for a full-fledged project.
Finally, I wanted to share a link to a post by Jodi Ohl.  Via her eNewsletter, Jodi asked her readers to submit "burning questions" about art-making and the artist's life.  She wrote a post responding to the question I shared with her, and I would love for you to check it out.  Here is what I wrote to her:

Hi Jodi!  I met you at the CREATE Mixed-Media Art Retreat in 2013, and I have a piece of your artwork hanging happily in my art room!  My burning question has to do with balancing artwork created for business versus artwork created for personal pleasure.  Once you become a professional artist, do you still have opportunities to create art simply for personal pleasure, or does it pretty much always have to serve some purpose--for a show, as a demonstration, as a commission, etc.?  And how is your process affected?  Is your process different when you are creating a piece for a specific purpose, versus just messing around, having a fun, trying out a technique, etc.?

You can read her response to me here.  If you have a question for Jodi, she is still accepting "burning questions" to respond to!


Thursday, September 11, 2014

Simply Handmade: Upcycled Magazines and Washi Tape Stickers

There are a few little paper crafting projects that I've done over the past couple of months, but never posted about, so I thought I would share them now.
When I came home from my Hawaiian vacation in June, I brought back as much paper ephemera as I could gather--maps, brochures, free magazine publications, and postcards.  Maps always figure prominently into my homemade envelope-making, so I set to making some Oahu-themed envelopes upon my return.
One of the magazines I picked up, whose name I have unfortunately forgotten and can't seem to track down online, is filled with Japanese writing.  I couldn't resist turning several of its pages into handmade envelopes, reinforcing the edges with kawaii tape from the Panda Love Shop on Etsy.

That same magazine featured a kawaii cartoon character scattered throughout its pages that caught my attention.
I had no idea what the little guy was meant to be, but my younger daughter took one look at him and said, "Oh, it's a little island!"  And I do believe that she is correct.  I cut out the island character wherever he appeared in the magazine, glued the magazine squares to adhesive paper, and created stickers that I can use on postcards and envelopes.
Speaking of stickers, I ran across a blog post on Moment to Live For (another link found via Snail Mail Magazine), in which blogger Sabine created a colorful dot notebook using washi tape stickers.  Her process is very simple, and clearly illustrated in her post:  She adhered two rows of washi tape onto wax paper, and then used a paper punch to cut out circle stickers, which could then be peeled from the wax paper.
When I made my washi tape circle stickers, I laid the rows of washi tape on adhesive-backed paper, punched out the circles, and then took the backing off to reveal the adhesive sticker back.  Sometimes I layered three different tapes, and sometimes I used a heart punch, rather than a circle.
Sabine stuck them all over the cover of a fairly plain Kraft-paper style notebook to really liven it up.  I confess that I just laid all of my creations on top of a notebook to see what they would look like, but didn't actually stick them down.  I've been using them on envelopes and postcards instead.
So there are a few very simple paper crafting projects that have made their way across my studio table over the past couple of months.  I feel like I need some sort of catchy tag line now, like, "Get on out there, and play with some paper!"

Sunday, August 10, 2014

Accordion Book House

Welcome to my Accordion Book House!
Not long ago, iHanna shared a link to a fun site called Snail Mail Magazine.  I have spent quite a lot of time browsing through the links and eye candy on this site.  (I found the link to the tutorial for the baker's twine kitties here.)  Among the posts, I found an inspiration book put together by the blogger called "Snail Mail Is..." 


Browsing through the pages of the online magazine, I saw an accordion-fold book with pages shaped like houses, and was inspired to create my own Accordion Book House (or would that be an Accordion House Book?)
I cut each page separately, with the roofs slanting every which way.  The only requirement was for the side of each house page to line up to the one next to it.  I used washi tape to connect the pages on the front side only.

The project was really just a fun excuse to play with my collage stash.  I like the vintage couple waving "hello" from the first page, and the little girl doing a handstand on the second page, as though inviting you in to play.  Next comes the kitchen, with its ad for spam.
The next page admonishes you to "handle with care"--I'm sure there is some deep psychological meaning to my inclusion of that page--and a vintage image of a woman ready to head out the door to her car, parked on the last page, which is the garage. 
Can you believe it?  There really is method to the madness of the images I choose!

On the back, I chose some pretty papers with open space that could allow this book to become a journal filled with personal writing.

A view of the back of the "house"
I've sent this Accordion Book House to a mail-art-loving friend who has been more than generous with the booklets, postcards, and postal ephemera she as shared with me.  I have plans for making more, though.  Creating it was a satisfying way to spend the afternoon!
Back view of the Accordion House Book
Visit the Snail Mail Magazine blog, and check out "Inspiration" under "Posts About" in the right hand margin for some very fun posts!

Sunday, July 20, 2014

Simply Handmade: Washi Tape Magnets

I love fast and simple projects. 

I love decorative tapes. 

And I love upcycling what might otherwise end up in the trash.

Put it all together, and Cintia at My Poppet came up with the perfect project for me:  DIY washi tape magnets!
How cute is Airmail Hello Kitty holding up Katy's kindergarten class photo?!
I had a little pile of advertising magnets down in the basement--rectangular shaped magnets from the kids' old pediatrician, the township where I live, and maybe an electrician we don't use.  Following Cintia's directions, I put a layer of adhesive/sticker paper over top of the advertising text, and then covered that with various decorative tapes that I like the look of enough to see on my refrigerator multiple times a day.  Then I cut through the magnet to create strips. 

Some I left straight-edged, and some I cut out a triangle at the end like an arrow or a banner. 
Bayla's preschool graduation certificate is now attached to the fridge with washi tape style!
Cintia is so right:  My fridge looks much happier now, too, with magnets that look like colorful pieces of tape!
Another fun airmail design waits in the wings for some more kids' artwork to hang.
Check out her blog for her step-by-step illustrated directions, and to see her other projects and tutorials!

Saturday, March 1, 2014

That's Pinteresting!: Cereal Box Books

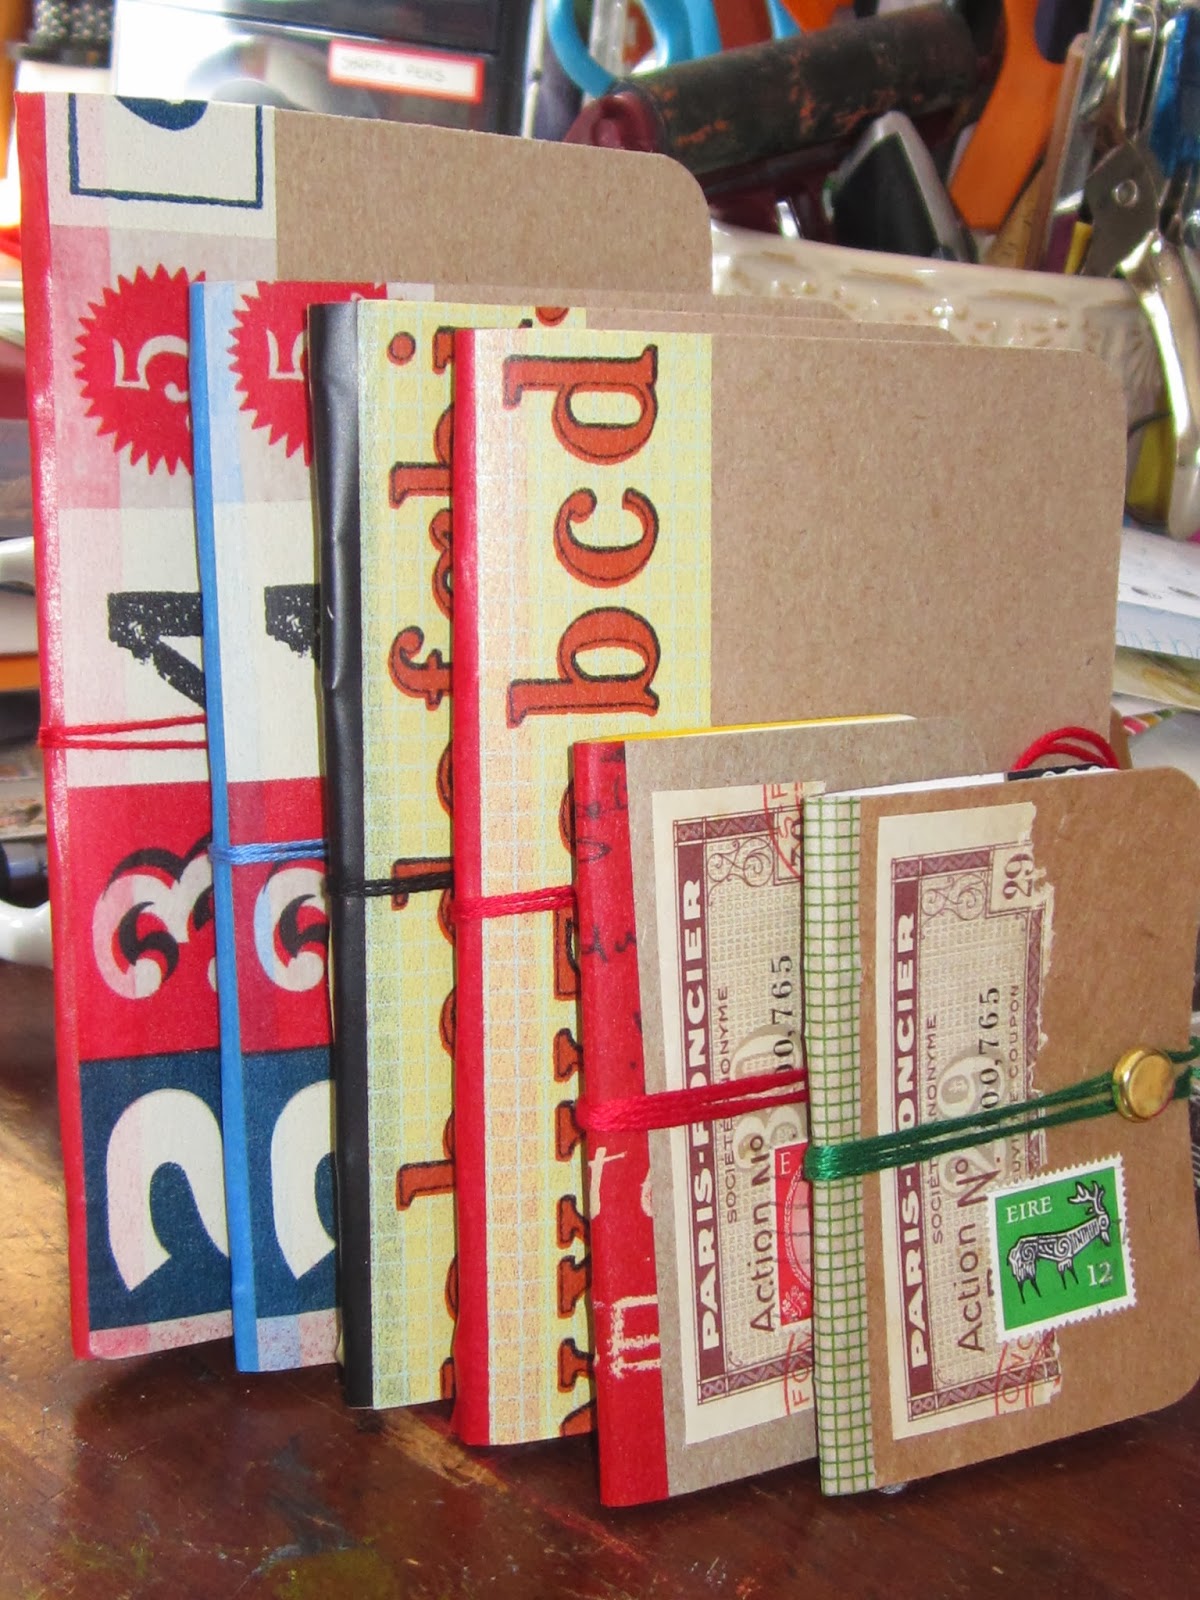
One of the ways I justify to myself all the time that I spend browsing on Pinterest is to make sure that I actually create some of the projects I pin.  One of my most recent efforts came from my Book and Journal Making board, where I pinned the DIY Cereal Box Notebooks and DIY Mini Pocket Notebooks from a Cereal Box created by Natalie at Crème de la Craft.
We go through cereal boxes like they're going out of style around here, so I have plenty of raw material to work with! 
The larger notebooks, which measure about 4 inches x 5-1/2 inches (though I made one that was slightly larger, too), require almost a whole side of a cereal box, while several of the smaller notebooks, which measure about 2-1/2 x 3-1/2 inches (adorable!), can be made from one box.  The size of the notebook is completely adjustable to your taste, though.
Natalie has all of the instructions you need for the project, so I won't reiterate the steps here; I'll just show you how cute all the little books came out so you will be motivated to dig out some cereal boxes from the recycling bin and have at it!
Instead of using scrapbook paper to cover the stitches in the spines, I used plastic-y electrical tape, and then prettied it up with decorative tapes from Cavallini.  (I thought the numbers and letters tapes looked appropriately school-like for my notebooks!)
Other than that, I think I followed Natalie's instructions exactly.  Using the corner-rounder punch, which she offered as an optional step, really did provide a much more finished professional look to each book.
And, of course, you could add any sort of rubber stamp, painted, drawn, or collaged decoration to the insides and/or outsides of the covers.  I left mine plain, for "cereal box chic."
The smaller notebooks are adorable, using a brad rather than a button for their closure. They are also super-simple, because you can use two staples to hold the paper in, rather than stitching with embroidery floss.  I didn't bother with electrical tape for these; I just used some decorative tape to cover up the staples on the spine. 
I collaged the covers with a piece of a vintage French coupon and a postage stamp.  I also made two Valentine-themed books for part of my daughters' Valentine's Day gifts.  The little ones have the round edges, too. 
These notebooks are seriously simple and fun to make, which make them a very satisfying project for someone like me, who enjoys pretty steady productivity!  Grab some empty cereal boxes and give it a try; I think you'll while away an evening before you know it.