Sunday, June 30, 2013

Index Card Art: Week Four

And the Index-Card-A-Day challenge continues!
ICAD3:  #22 "Fresh Start"
Collage with magazine/catalog images and decorative tape
ICAD3:  #23  "Crawl Through Life"
Collage with magazine/catalog images and decorative tape
ICAD3: #24  "Care"
Lettering and doodling with markers on watercolored background
ICAD3:  #25 "Today is a good day"
Lettering and doodling with markers on watercolored background
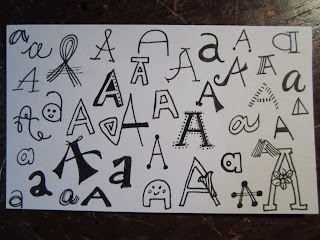
ICAD3:  #26  "Sampler:  A"
Lettering with black pen, using ideas from Jenny Doh's Creative Lettering
ICAD3:  #27  "Dutch Wonderland"
Collage of Dutch Wonderland map and brochure with green Dymo tape
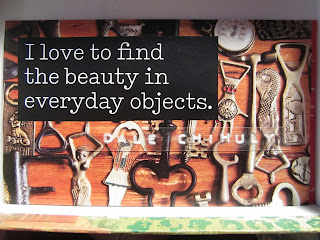
ICAD3:  #28  "Chihuly Collection:  Bottle Openers"
Collage using images from booklet from Collections Café in Seattle,
with clear Dymo tape
ICAD3:  #29  "Chihuly Collection:  Radios"
Collage using images from booklet from Collections Café in Seattle,
with red Dymo tape; quotation from Edward R. Morrow
 
Visit Tammy's blog to see the rest of the ICAD fun!
 

Tuesday, June 25, 2013

Art Journal Round Robin: Journal Spreads

My wonderful Art Journal Round Robin project with Danielle, Mary, and Janet is coming to a close!  Our own journals will be heading home to us in mid-July, and I am excited to see the varied art that will fill the pages that were sent off so plain and blank just months ago. 

Here are my latest contributions to the last two journals I have worked in for our exchange:
My clippings from Austin publications have found their way into my index card art and postcards, and as you can see here (above), they've found a place in my art journaling as well!  I also included some clippings from a Seattle magazine I picked up when I visited there last fall.   I also raided my decorative tape supply, my circle cutter tool, and my micron pen for journaling, lettering, and a bit of flower doodling.  My journaling reflects on the creative and individual spirit of both Austin and Seattle, and questions whether we might be able to bring a bit of that wonderful spirit into our own communities.
For this spread, above, I raided my stash of small collage elements to create a border around the page, completing it with some hand-drawn lines.  The sentiment lettered at center comes from a song we sang at church on the day I completed this page:  "On Christ the solid rock I stand...All other ground is sinking sand."  Having that solid foundation brings confidence to my days!
This spread (above) has a bit of a mail art vibe to it.  I used one of the envelopes procured at the Allentown Paper Show with its authentic air mail stripes, postage stamps, and cancellations.  I used more clippings from my stash of small collage elements, along with circle stickers from the office supply shop and some air mail-themed decorative tape. 
For the pages above, I was clearly inspired by Patty Radish in the latest edition of Art Journaling by Somerset Studio.  Her article was the piece that clinched the purchase for me; spending $15 on a magazine is not done without good reason and a great deal of forethought!  I loved her color scheme; her use of photos, paint, text, and tapes; and the way she highlighted the faces with painted circles. 
I used acrylic paint and some pieces of French text to create my background.  I added photocopied photos and lots of decorative tape to my design.  Then, I used a milk bottle cap dipped in acrylic paint for my circles, and an old driver's license card to apply the straight lines of paint on each page.  And, of course, you can see my bubble wrap circles in French vanilla! 
Even though this is a completely derivative spread--based on someone else's ideas and not my own--I absolutely love it!  It suits my style so completely, was great fun to create, and gives me a lot of pleasure just to look at.

I'll be sure to show you all of the completed pages of my Round Robin Art Journal as soon as it returns to me in July!

********************************************
I am linking up with Aimee's Glue It Tuesday.  Visit her blog to see more gluey goodness!

Saturday, June 22, 2013

A New Take on Altered Clipboards

Over the years, I have clipped and printed several articles related to altered clipboards.  In my 2013 quest to be a "doer," and not simply a "collector of ideas," I decided to finally act upon the inspiration, starting slow, with a few smaller-sized clipboards I purchased at an office supply store.

When I sat down with the clipboards, I knew that I wanted to collage them with the papers I had acquired at the Allentown Paper Show--vintage photographs, old documents, well-traveled postal envelopes, and postcards--along with international currency I scored at Brigg's Auction.

But as I started to collect items together that I wanted to incorporate onto each clipboard, a new idea was born.  Instead of cutting up the ephemera to glue onto the clipboards, I decided to layer the selected pieces to create a kind of document collection clipped to each board. 
My intention was to display the altered clipboards anyway, rather than use them in the traditional sense, covering over the alterations with my own stacks of day-to-day note-taking. 
This revised approach, while "an easy way out," to be sure, allows flexibility and assures the integrity of the vintage items I was including in each piece.  Nothing is cut, nothing is pasted. 
Everything can be removed, re-conceptualized, and re-arranged. 
The three clipboards have become a display item in Studio 791, hanging from nails between the door to the room and the closet opening. 
I may yet alter a clipboard in the more "traditional" sense of the project, but for right now I am enjoying the fruits of this approach!

Thursday, June 20, 2013

Index Card Art: Week Three

Another week of the Index-Card-a-Day (ICAD) challenge has passed, and I'm on time this week to show my latest creations.
ICAD3:  #15
Raw Art Journaling:  Getting Edgy
My cards continue to run the gamut of markering, collage, and doodling.
ICAD3:  #16
Stuff on My Desk 2
ICAD3:  #17
Cheater, Cheater Sketchbook Series I
I certainly have never claimed to have a "signature style," and my index card collection continues to attest to that fact!

Card #15 resulted from an exercise called "Getting Edgy" from Quinn MacDonald's Raw Art Journaling book.  Her exercises have been fueling several of my index cards!

Card #16 is another result of simply rummaging around the scraps on my art table when index-card-making time rolled around.

And Card #17 is a bit of a "cheat" because I simply photocopied a page in my sketchbook that I had been working on, and glued it to an index card.  Because I don't have too many hours to work on my art each day, sometimes a project has to do double-duty.  If I manage to work in my sketchbook, then it will have to serve as my index card that day as well!
ICAD3:  #18
Cheater, Cheater Sketchbook Series II
I did the same thing for Card #18:  photocopied a page of doodles from my sketchbook and glued it to an index card.  I recently purchased Creative Lettering:  Techniques & Tips from Top Artists, by Jenny Doh, and fell in love with Flora Chang's doodles in the very first section.  Trust me, you will be seeing plenty more blog posts inspired by the work in this fun book!
ICAD3:  #19
Cheater, Cheater Sketchbook Series III
After getting into the doodling mode from the lettering book, I visited Michael's and saw a series of stamp sets with little doodle images.  (Perhaps they were the Recollections brand?  I'm not sure.)  I took photos with my phone, and then came home to add the doodles to my sketchbook.  One more photocopy and glue stick adhesion and Card #19 was born!
ICAD3:  #20
Raw Art Journaling:  Free Floating Bubbles
Card #20 is another exercise from Quinn MacDonald's book.  They are fun to draw, and fun to color in with my Sharpie markers.  Nothing too involved...just some free-form doodling fun!
ICAD3:  #21
Raw Art Journaling:  Over & Under
My final card for the week is another exercise from Quinn's book, and one that I did on a card last week.  Once you start doing these Over & Under cards, you really don't want to stop!  They are basically the Zentangle pattern called Hollibaugh, which is one of my favorites.  Crazy thing about this card:  it is actually purple and blue!  But I couldn't manage to capture the correct colors with my camera, no matter how much I messed with the lighting.

As wonderful as ICAD is, I have no intention of turning my blog into a show-and-tell of my ICAD cards.  Please come back this weekend and next week for some posts that will show you art journal pages, some new additions to the walls of my studio, and MORE!

Visit here for my cards from week one.
Visit here for my cards from week two.

Monday, June 17, 2013

Glue It Tuesday: ICAD Edition

I have been doing a great job keeping up with Tammy's Index-Card-A-Day (ICAD) challenge, but not such a great job keeping up with posting my cards.  Here are the results of my second week of creating a little piece of index card art each day.  You'll see that in addition to digging into my marker drawer, I've spent plenty of time with my UHU glue stick, qualifying this post for Aimee's Glue It Tuesday!
ICAD3 #8:  "LBJ"
I made a collage of some of the pamphlets I picked up in Austin when I visited the LBJ library.  My husband's cousin is the director there, which allowed us a great behind-the-scenes look in addition to the regular exhibits.
ICAD3 #9:  "Austin"
I made a collage of some of the free publications I picked up in Austin when I visiting there about a month ago.  I had made a bunch of postcards from these types of clippings, and I knew I wanted Austin represented in my ICAD cards.
ICAD3#10:  "Circle Series:  Blue"
I used my circle cutting templates to create circles from various magazines that were headed to recycle bin.  I used washi tape to create a kind of frame along the edges.
ICAD3#11:  "Circle Series:  Vintage"
Just as above, I used my circle cutters and washi tape for this card.
ICAD3#12:  "Circle Series:  Green"
Another in the series from above.
ICAD3#13:  "Over and Under"
I used an exercise called Over and Under from Quinn McDonald's Raw Art Journaling to create this card, and had fun with markers to fill in the lines and spaces.
ICAD3#14:  "Stuff on My Desk"
Perhaps my favorite exercise, I just grabbed scraps from my tabletop, left over from other projects, and glued them down to create this card, with some marker semi-circles at the bottom.
My pile of index cards is slowly growing, growing.  I will try to get on Tammy's schedule for posting updates on Fridays.  I'm finding her ICAD challenge to be a very satisfying creative habit!

Check my blog here to see my cards from week one of the challenge.


Tuesday, June 11, 2013

Glue It Tuesday: Postal ATCs

I've been making postal-themed ATCs with some of my postage stamp jackpot from the auction last April.  I sat down to make one for an individual trade with the incomparable mail artist, Pamela, of Cappuccino and Art Journal, but when it comes to ATCs, it's really tough to stop at one!

For the first two, I channeled my "inner Karenann Young," whose postcards and altered Rolodex cards make me swoon.
My second two were created from one piece of postal ephemera I acquired at the Allentown Paper Show last month.  When I start with such a great foundation, there's no need to add much:
I have one ATC left over from a previous postal batch:
One of these (and I won't reveal which one) is on its way to Pamela, but if you would be interested in creating your own version of a postal-themed ATC, I would love to make a trade!  Let me know in the comments, or via an email to aleakaskey@yahoo.com, and we'll set something up. 

Happy Gluing!

Saturday, June 8, 2013

The Return of ICAD

This is just the beginning...
Last year, I participated in Tammy's Index-Card-a-Day (ICAD) challenge over at Daisy Yellow.  I hung in for the full 61 days, and ended up with a pile of 3"x5" casual art pieces reflecting my whim of the day.  (I have an "ICAD" label in the left margin of this blog if you'd like to look through my posts from the challenge.  Check out the delicious pile of cards from the end of the challenge!)

The challenge is on again this summer, and I'm back to creating my daily cards.

Here is my progress over the course of the first week:
ICAD3:  #1
For the first card, I used the suggested theme for week 1:  rainbow.  I used this opportunity to play with my Souffle pens by Sakura.  Hence the card's title, "Rainbow Souffle."
ICAD3:  #2
I used a library card for one of my cards last year, so this time around I created my own library card on an index card, and then stamped this face stamp with Distress ink.  I call this one, "Library Muse."
ICAD3:  #3
One of Tammy's optional prompts for this first week was "zebra," so I created this doodle and called it "Curly Zebra."  I like the name even better than the card!
ICAD3:  #4
I started doing a series of drawing exercises from Quinn McDonald's book, Raw Art Journaling, and working on her Confetti Lines led me to my Tornado Series.  Here is the first one, created with various colored pens.
ICAD3:  #5
Here is the second in my Tornado Series, and it made me realize how much I really like my gold metallic pen, even though I am not usually a "fan" of gold!  I even thought the back of the card looked pretty, so I added some swirling black lines to make it sort of double-sided.  (You can also see how I label each of my cards on the back!)
the back of ICAD3:  #5
ICAD3:  #6
I created my final "tornado" on a card, then cut it out.  I created a cross-hatch design on another card, and then adhered the tornado with pop dots.
ICAD3:  #7
My last index card from the week includes another of Quinn's exercises.  She calls it "lightning lines," but I call them "Ice Crystals".  I tried to choose icy-colored markers, and have vowed to go pen shopping again due to my limited selection of colors!

I will be checking in weekly to share my progress in the challenge.  You can check out the other participants' efforts using the Linky list Tammy has provided on her blog.

And the greatest beauty of the challenge is that you can join at any time, without trying to go back to make up for lost time!  If you want to join in RIGHT NOW, check out the suggested (and purely optional) prompts for this next week.  Let me know if you plan to play along!


Wednesday, June 5, 2013

Carved Stamp Collection

Back in December, I share the results of my first foray into stamp carving.  I used Geninne Zlatkis's book Making an Impression:  Designing and Creating Artful Stamps to instruct me on the basic technique and to provide my first few designs.  Then I branched out to some designs from other books, as well as some freehand efforts.

I've picked up my lino cutter and some Speedball Speedy Cut carving block several times over the past few months, and I want to take you through a little "Gallery Walk" of the carved stamps I've added to my collection.
You can see the carved stamp at the top, and the rubber stamp impression using black Staz On ink on card stock on the bottom.  I love the little cupcake.  At first I was going to carve out all the marks on it, but then thought it looked like sprinkled frosting, so I kept them!  And I saw the idea for the rain cloud with different facial expression online.  I've only carved the happy face option, so far.  The two letter stamps in the middle are perfect for mail art, of course!
To create a hand stamp, I printed an image from the internet, reduced its size on my printer, and used the smaller size as my template.  I think it looks like a hand waving "hello," so it's fun for mail art, too.
I have really fallen in love with carving silhouettes.  So far, I have used images that I have printed from the internet.  Usually I shrink them to a more "rubber stamp-appropriate" size.  I think they look so amazing!
I used an actual tag (shown on the left) to create the tag stamp shown here.
And here, I used actual objects--two tags and a mini-clipboard--to design these simple but useful stamps.
I was super-excited to use an old-fashioned Dennison label (my favorite!) to create the stamp on the left.  The red Staz On ink makes all the difference to the effect!  And the "hello" stamp is my first word, and I was really pleased with how it came out.  (Geninne's technique makes word stamps really easy to create--no need to write backwards on your rubber!)
I wasn't so excited about how my handwritten name stamp came out, but it was a first try!
I was kind of proud of the "houses on a hill" stamp, above, because I completely designed and drew the image myself--no relying on internet images!  And it's kind of cute.  The butterfly was made from an image off the internet.
I was going to cut away the background so this was just a hand with a heart inside, but I kind of like how the background looks along with it.  I can always carve it away later if I change my mind!
I carved this stamp to look like the journaling lines that Traci Bunkers uses in her book, The Art Journal Workshop.  I think these could use a little work, too, but they could work on a certain style page.
I made these three little houses using the design I found on A Beautiful Mess.  Then I created a little house with an interchangeable roof.  I think it needs some work (I was just using up my scraps to create the roof options), but I love the idea!
I think that about covers the stamps I've carved so far.  You can see some postcards I created with my hand carved stamps in an earlier blog post.

And you can check out my ever-growing bank of ideas for stamp carving designs on my Pinterest board.  I have loaded up on Speedy Carve blocks, so there will be plenty more hand-carved stamps in my collection soon!