I have stored my ever-growing collection of decorative tapes in a number of different ways over the past years--most recently in a decorated box and then in a bright red toolbox. But then a Pinterest pin caught my eye, and I remembered this wooden schoolhouse display box that I purchased at a yard sale two summers ago.
There are loads of attractive ways to store decorative tape, but not all of them are practical for actual use. For example, I could put all of my pretty tapes in a big glass jar, but what if the roll I need is stuck way down at the bottom? I don't want to have to dump the whole jar over to get to the roll I want to use!
And if I put them onto a dowel mounted on my wall, what if I need to take a roll down to measure exactly how much I need for my project? I would have to take all the rolls off the rod to get to the one that I need.
This schoolhouse storage strategy hasn't stood the test of time yet, but it seems like it might work.
It allows me to keep color families together. I tend to use several rolls of similar colors at one time, so I can slide out a column to use for any given project. It is simple enough to then slide the column of tapes back into place.
And, last but not least, it looks pretty cool in the corner of my craft space!
I love it when a $2 purchase that has been sitting in the basement for two years comes to light as the "perfect" solution!
Showing posts with label organizing. Show all posts
Friday, January 3, 2014
Monday, December 9, 2013
Artful Organization for the New Year
When I started spending time on Pinterest, I discovered that just as there are entire communities dedicated to art journaling, mail art, and drawing Zentangles, there is also an entire community that shares and shows off its daily and weekly planners. I created a board entitled Daily/Weekly Plan Books, and pinned picture after picture of delicious planner pages using washi tape, stickers, sticky notes, tabs, markers, and illustrations to keep track of the owners' day-to-day lives. I was hooked!
My weekly planner is a workhorse: it keeps my head on straight when trying to keep track of all of the drop-off and pick-up times; play dates and meet up; parties and meetings; paperwork, phone calls, and emails; errands and shopping needs. While I have a great book (from Martha Stewart Home Office for Avery from Staples), and used pretty scrapbooking papers to create fun monthly dividers, beyond that, my calendar pages have always been a mess.
For 2014, I decided to change all that!
One of my pins came from Jennifer at My Purpley Life. Week by week, Jennifer shares (through both posts and videos) how she prepares her Filofax pages to make them personalized, colorful, and fun. After watching just one of her videos, I raced to Staples to purchase 2014 calendar pages from Day Runner (which I prefer over the Martha Stewart format I've used this year, with long columns for each day), and settled into decorating my own planning binder for the new year.
Basically, I set myself up in front of evening TV with my stash of decorative tapes and a big bag of stickers, and just played around for two evenings.
I've gotten about 2/3 of the year decorated at this point.
I just know that using these pages in the new year is going to brighten up the task of planning my days!
I even have used some stickers from my sticker collection from when I was a little kid!
Does anyone remember Glurfs? (Notice the 1981 copyright!)
Does anyone still have stickers left over from when they were a kid? I adored my sticker collection!
I had to leave enough space to keep the planner usable, of course; it won't be worth much if I don't have room to write in my appointments, after all! But I added enough color and whimsy to infuse more creativity into what has been a very bland and boring part of my life.
Take a look at my Daily/Weekly Plan Books board on Pinterest, and see if you don't get inspired to do some artful organization for the New Year!
My weekly planner is a workhorse: it keeps my head on straight when trying to keep track of all of the drop-off and pick-up times; play dates and meet up; parties and meetings; paperwork, phone calls, and emails; errands and shopping needs. While I have a great book (from Martha Stewart Home Office for Avery from Staples), and used pretty scrapbooking papers to create fun monthly dividers, beyond that, my calendar pages have always been a mess.
For 2014, I decided to change all that!
One of my pins came from Jennifer at My Purpley Life. Week by week, Jennifer shares (through both posts and videos) how she prepares her Filofax pages to make them personalized, colorful, and fun. After watching just one of her videos, I raced to Staples to purchase 2014 calendar pages from Day Runner (which I prefer over the Martha Stewart format I've used this year, with long columns for each day), and settled into decorating my own planning binder for the new year.
Basically, I set myself up in front of evening TV with my stash of decorative tapes and a big bag of stickers, and just played around for two evenings.
I've gotten about 2/3 of the year decorated at this point.
I just know that using these pages in the new year is going to brighten up the task of planning my days!
I even have used some stickers from my sticker collection from when I was a little kid!
Does anyone remember Glurfs? (Notice the 1981 copyright!)
Does anyone still have stickers left over from when they were a kid? I adored my sticker collection!
I had to leave enough space to keep the planner usable, of course; it won't be worth much if I don't have room to write in my appointments, after all! But I added enough color and whimsy to infuse more creativity into what has been a very bland and boring part of my life.
Take a look at my Daily/Weekly Plan Books board on Pinterest, and see if you don't get inspired to do some artful organization for the New Year!
******************************************************
Do you receive emails from Beth Kempton of Do What You Love? She just sent out a free, downloadable resource entitled New Year's Revolution: A Practical Kit to Help You Make 2014 the Year You Do What You Love. I printed out the whole 24-page packet, and am enjoying looking through the writing and goal-setting prompts, and the calendars for each month of 2014 to help us keep ourselves on track towards our goals. Visit the Do What You Love web site, and click on the prompt at the top to download your own copy!
Tuesday, August 27, 2013
Around Here
You know how so many people use blogging and social media to present the "perfect" side of life, their words and images projecting the idea that nothing ever goes wrong in their idyllic homes?
Today's post shares words and images of that kind of idyllic day around here. Yesterday. Today, however, is a totally different kind of day, about as opposed to the domestic bliss of yesterday that a house with two tempestuous preschoolers can manage!
But posting these photos from yesterday, reviewing what a lovely and productive day it was, will help me get through the "opposite day" that today has proven to be!
So, around here, YESTERDAY:
I worked to preserve some of my bumper crop of basil before the chilly months of fall and winter set in. Some I just put on the countertop in a vase; I read that basil develops roots in water, and will last for a couple of months. If that proves true, I will bring in some more at the end of September.
I also chopped a bunch of the leaves, put them into ice cube trays, and covered them in water. I will be popping them out of the trays and storing them in a freezer bag for easy retrieval for spaghetti sauce and other preparations, come winter. The smell and taste of fresh basil just about TOPS my list of favorites, and I think it will be a great antidote to wintertime blues.
Soon, I am planning to use some of my basil to create basil butter, which can be frozen for up to six months, and maybe even some basil salt.
Feeling fabulously domestic at that point, I made some banana bread to use up some especially mushy bananas headed straight for the garbage if I didn't do something soon:
And, as a final project, I cleaned up my $2 worth of "thrift store finds" in preparation for a project I've seen pinned in numerous variations on Pinterest. People glue all manner of plates, platters, bowls, burner covers, candlesticks, spindles, and dowels to create tiered organizers for a multitude of different uses. I've pinned a couple versions on my Miscellaneous Craft Projects board.
I used Gorilla Glue to adhere my two tiers--a plate and a bowl--to a candlestick holder. If a proper third tier presents itself on a future thrift store venture, then I will add it, but for now this is what I've got:
I'm not sure how I'll end up using it, but you can be sure that I am eyeballing everything in my craft room, looking for its perfect employment. I also think it would make a great chip-and-dip presentation at a party, or perhaps veggies and dip! But with art supplies competing, I don't think it will end up in the kitchen.
Best wishes for your own domestic bliss and creative re-use!
Today's post shares words and images of that kind of idyllic day around here. Yesterday. Today, however, is a totally different kind of day, about as opposed to the domestic bliss of yesterday that a house with two tempestuous preschoolers can manage!
But posting these photos from yesterday, reviewing what a lovely and productive day it was, will help me get through the "opposite day" that today has proven to be!
So, around here, YESTERDAY:
I worked to preserve some of my bumper crop of basil before the chilly months of fall and winter set in. Some I just put on the countertop in a vase; I read that basil develops roots in water, and will last for a couple of months. If that proves true, I will bring in some more at the end of September.
I also chopped a bunch of the leaves, put them into ice cube trays, and covered them in water. I will be popping them out of the trays and storing them in a freezer bag for easy retrieval for spaghetti sauce and other preparations, come winter. The smell and taste of fresh basil just about TOPS my list of favorites, and I think it will be a great antidote to wintertime blues.
Soon, I am planning to use some of my basil to create basil butter, which can be frozen for up to six months, and maybe even some basil salt.
Feeling fabulously domestic at that point, I made some banana bread to use up some especially mushy bananas headed straight for the garbage if I didn't do something soon:
And, as a final project, I cleaned up my $2 worth of "thrift store finds" in preparation for a project I've seen pinned in numerous variations on Pinterest. People glue all manner of plates, platters, bowls, burner covers, candlesticks, spindles, and dowels to create tiered organizers for a multitude of different uses. I've pinned a couple versions on my Miscellaneous Craft Projects board.
I used Gorilla Glue to adhere my two tiers--a plate and a bowl--to a candlestick holder. If a proper third tier presents itself on a future thrift store venture, then I will add it, but for now this is what I've got:
Perhaps a desktop organizer for frequently-used paints and mark-making tools, like
natural sponges, old credit cards, droppers, milk bottle lids, and makeup sponges.
Or perhaps a project organizer, holding the bottles I plan to alter with
some of the paper materials I plan to use to embellish them.
Or perhaps it is best suited to hold tried-and-true office supplies, like paper clips,
rubber bands, staplers, staples, and a staple remover.
I'm not sure how I'll end up using it, but you can be sure that I am eyeballing everything in my craft room, looking for its perfect employment. I also think it would make a great chip-and-dip presentation at a party, or perhaps veggies and dip! But with art supplies competing, I don't think it will end up in the kitchen.
Best wishes for your own domestic bliss and creative re-use!
Sunday, April 14, 2013
Clearing the Decks
Taking a week-long blogging break gave me time to re-consider both creative time and space. When it comes to space, the conclusion was undeniable: my studio was just too messy to accomplish the things that I wanted to do. I dug in and cleared the decks last night, and I am thrilled with the results.
The worst offender was my art table, along with the floor surrounding it. The piles had gotten so out of hand that I had little space in which to work, little floor to walk without trampling supplies, and too many chances of misplacing small items that I might want to use.
The first thing I did was buy two three-drawer organizers from Target. Though I am trying to reduce the amount of plastic that I bring into my home, I just couldn't find a substitute for the convenience of these little drawers. I labeled them for the following contents: notepads, stamps and inks (the few that I find myself using again and again in my mail art and art journaling; the rest are housed in my larger closet storage area), glue and tape, Sharpies (I have so many of that single brand in three different sizes that they fill their own drawer), black and white pens (many purchased while taking Joanne Sharpe's Letter Love class; I love having such a variety), and colored pens (all the rest). I have known for awhile that I should be storing my pens and markers on their sides instead of up and down in cups on my table, but haven't bothered to make the change. I was watching a video on Saturday of Diana Trout packing up a travel art kit, and this time when I heard her emphasize storing pens on their sides to preserve the ink, I decided to heed the call!
I love having art from my blogging friends on display in my studio. In addition to my art wall, I hung a new print from Aimee right above my work table. Along with the gorgeous doodled-dressed woman, the text reads: "Here comes the creative fire, that elusive gypsy who arrives so unexpectedly with her vivid imagination, exotic ideas, and lavish notions. I wonder how long she'll stay." A good reminder to seize the creative moment!
I continue to use my inspiration board above my table to display little doodads--some little art pieces my daughter has made; artwork by Aimee, Caatje, Viv, Gini, Alexandra, and Pamela; a favorite photo of myself when I was two-years-old; the first dollar my crafts ever earned me (thanks, Heather!); a little set of prayer flags; and some little crafted items I have made in the past, like felt flowers, a fabric strawberry, and a fabric and button flower.
Over my bookcase is another display that includes blogging friends' artwork: a postcard from Lee, am ATC from Janet, a journal page from my mother, a wreath from April, and another print from Aimee. The shelf also has my studio saint, one of the first pieces of artwork I had published (in Somerset Studio many years ago), a pin cushion, my button collection, and an hourglass.
This view of my bookcase is not particularly attractive in terms of photography, but gorgeous to me in the tidiness of the floor! This space used to be absolutely covered in piles of papers, books, and just general STUFF. It's too bad that I did not think to take "before" photos of the floor and my table, so that you could get the full effect. Trust me, the transformation is pretty miraculous!
One things that helped was to bring in an extra set of shelves to tuck behind my door. My girls got their "big girl" twin beds this weekend, so we had to move a dresser out of their room. It turned into a game of "musical furniture." My husband put the dresser into his office and moved out a bookcase. I nabbed the bookcase and put it in my studio for extra storage space. Some of the things that had crowded my table and floor can now be stored here, out of sight but not out of mind.
Now, if only my daughters will catch the tidying bug, and clean up their art-making space inside my studio!
Finally, I leave you with one of my top organizing tips. Whenever you are trying to declutter and organize a space, the best thing you can do is to remove everything completely and put it somewhere else to go through. If you are decluttering a drawer, take everything out, wipe out the drawer, and put back just the things that you want to store there. Don't just open the drawer and try to take out the things that you think you should get rid of; it's too hard to decide when they are sitting there in their usual territory. If you are decluttering a desk (as I did), take everything off the surface, wipe it down, and put back just the things that you want to keep there. When I try to declutter by picking things out to put somewhere else, I am much less effective than when I clear it all off, see all of its tidy potential, and then make a conscious decision about what is worth putting back into the space. Make sense?
I feel much more empowered now to tackle my unfinished projects and embark on some new pursuits!
If you didn't read my last post about Philadelphia's Magic Gardens, please go back and take a look at it; everyone should know about this truly magical place!
*******************************************
I'm now on Pinterest! Yes, I finally gave in, and am thoroughly enjoying the process of building up my boards with things I have had bookmarked on my computer, or that I am finding on other people's boards. Come by for a visit, and check out what I've pinned!
The worst offender was my art table, along with the floor surrounding it. The piles had gotten so out of hand that I had little space in which to work, little floor to walk without trampling supplies, and too many chances of misplacing small items that I might want to use.
The first thing I did was buy two three-drawer organizers from Target. Though I am trying to reduce the amount of plastic that I bring into my home, I just couldn't find a substitute for the convenience of these little drawers. I labeled them for the following contents: notepads, stamps and inks (the few that I find myself using again and again in my mail art and art journaling; the rest are housed in my larger closet storage area), glue and tape, Sharpies (I have so many of that single brand in three different sizes that they fill their own drawer), black and white pens (many purchased while taking Joanne Sharpe's Letter Love class; I love having such a variety), and colored pens (all the rest). I have known for awhile that I should be storing my pens and markers on their sides instead of up and down in cups on my table, but haven't bothered to make the change. I was watching a video on Saturday of Diana Trout packing up a travel art kit, and this time when I heard her emphasize storing pens on their sides to preserve the ink, I decided to heed the call!
I love having art from my blogging friends on display in my studio. In addition to my art wall, I hung a new print from Aimee right above my work table. Along with the gorgeous doodled-dressed woman, the text reads: "Here comes the creative fire, that elusive gypsy who arrives so unexpectedly with her vivid imagination, exotic ideas, and lavish notions. I wonder how long she'll stay." A good reminder to seize the creative moment!
I continue to use my inspiration board above my table to display little doodads--some little art pieces my daughter has made; artwork by Aimee, Caatje, Viv, Gini, Alexandra, and Pamela; a favorite photo of myself when I was two-years-old; the first dollar my crafts ever earned me (thanks, Heather!); a little set of prayer flags; and some little crafted items I have made in the past, like felt flowers, a fabric strawberry, and a fabric and button flower.
Over my bookcase is another display that includes blogging friends' artwork: a postcard from Lee, am ATC from Janet, a journal page from my mother, a wreath from April, and another print from Aimee. The shelf also has my studio saint, one of the first pieces of artwork I had published (in Somerset Studio many years ago), a pin cushion, my button collection, and an hourglass.
This view of my bookcase is not particularly attractive in terms of photography, but gorgeous to me in the tidiness of the floor! This space used to be absolutely covered in piles of papers, books, and just general STUFF. It's too bad that I did not think to take "before" photos of the floor and my table, so that you could get the full effect. Trust me, the transformation is pretty miraculous!
One things that helped was to bring in an extra set of shelves to tuck behind my door. My girls got their "big girl" twin beds this weekend, so we had to move a dresser out of their room. It turned into a game of "musical furniture." My husband put the dresser into his office and moved out a bookcase. I nabbed the bookcase and put it in my studio for extra storage space. Some of the things that had crowded my table and floor can now be stored here, out of sight but not out of mind.
Now, if only my daughters will catch the tidying bug, and clean up their art-making space inside my studio!
Finally, I leave you with one of my top organizing tips. Whenever you are trying to declutter and organize a space, the best thing you can do is to remove everything completely and put it somewhere else to go through. If you are decluttering a drawer, take everything out, wipe out the drawer, and put back just the things that you want to store there. Don't just open the drawer and try to take out the things that you think you should get rid of; it's too hard to decide when they are sitting there in their usual territory. If you are decluttering a desk (as I did), take everything off the surface, wipe it down, and put back just the things that you want to keep there. When I try to declutter by picking things out to put somewhere else, I am much less effective than when I clear it all off, see all of its tidy potential, and then make a conscious decision about what is worth putting back into the space. Make sense?
I feel much more empowered now to tackle my unfinished projects and embark on some new pursuits!
*******************************************
*******************************************
I'm now on Pinterest! Yes, I finally gave in, and am thoroughly enjoying the process of building up my boards with things I have had bookmarked on my computer, or that I am finding on other people's boards. Come by for a visit, and check out what I've pinned!
Saturday, October 6, 2012
Best Organizational Idea EVER!
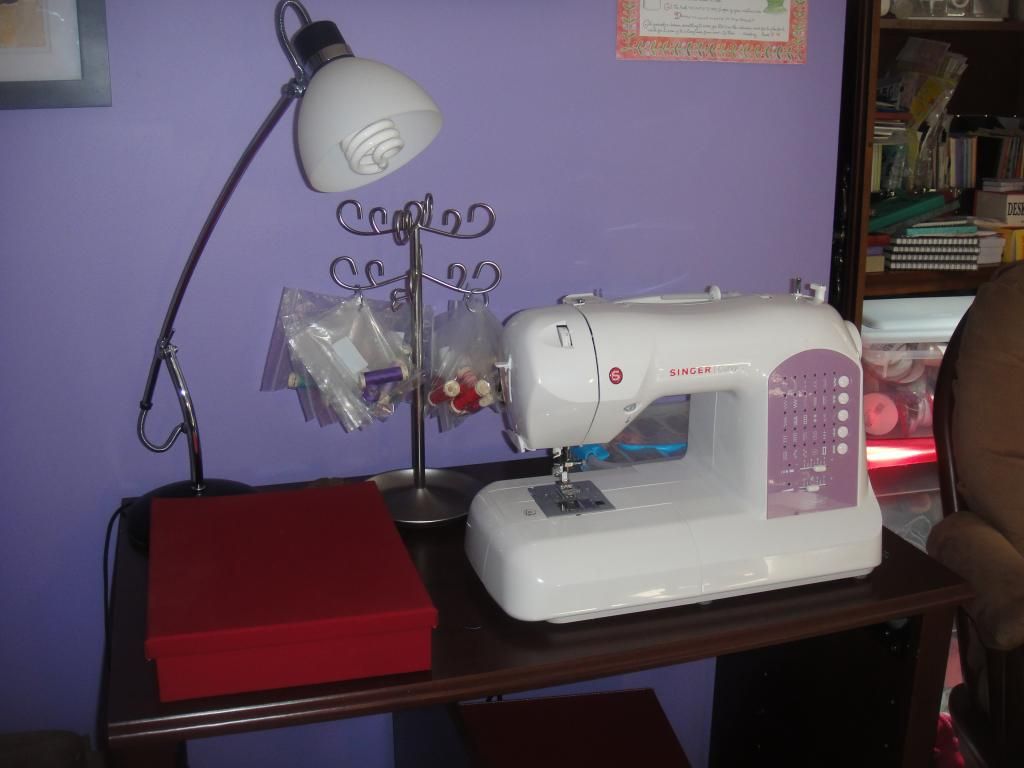
When I first started using my sewing machine last year, I was amazed that I could not find a way to organize my thread so that my spools could be stored alongside my bobbins.
If you don't use a sewing machine, you may not realize that stitches are made through the combined contributions of thread from a spool and a bobbin. It blew my mind that there was no storage box that kept spools and bobbins of the same color next to one another.
If I used several shades of blue, for example, I had to be very careful that I didn't mix one shade of blue on a spool with another shade of blue on a bobbin. There are storage boxes for spools and storage boxes for bobbins, but not storage boxes to keep spools and bobbins together!
I asked my mother, who has sewed for a lifetime, as well as the woman at the store where my mother purchased my sewing machine to make sure I wasn't crazy, and they both confirmed that no such storage box exists.
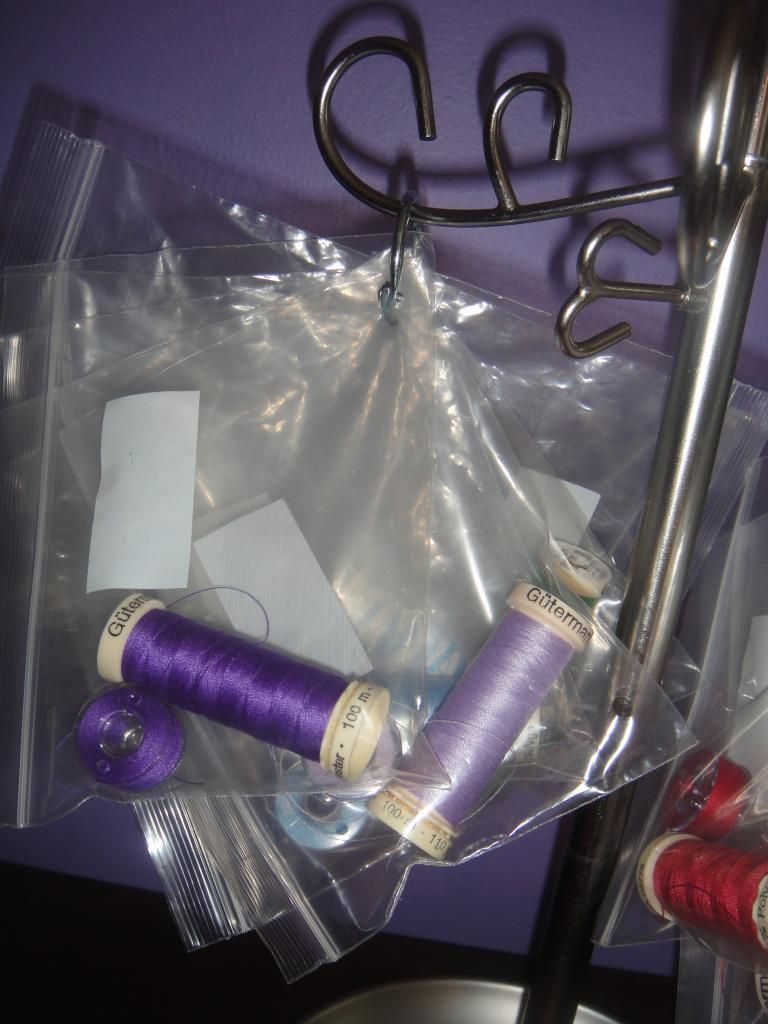
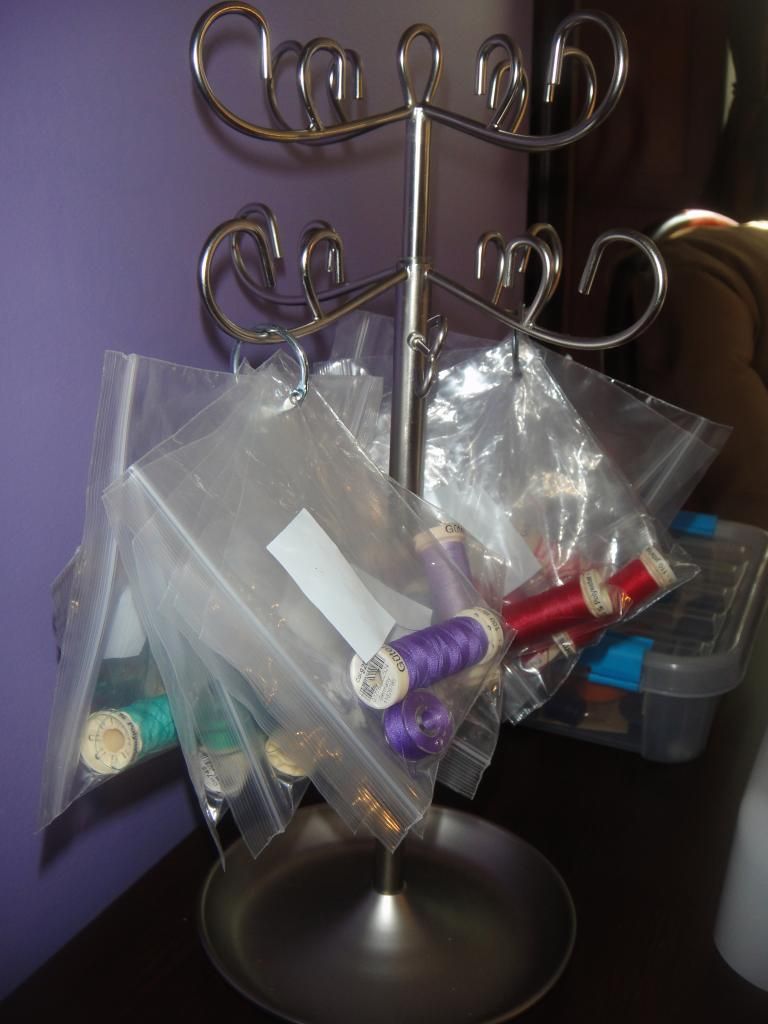
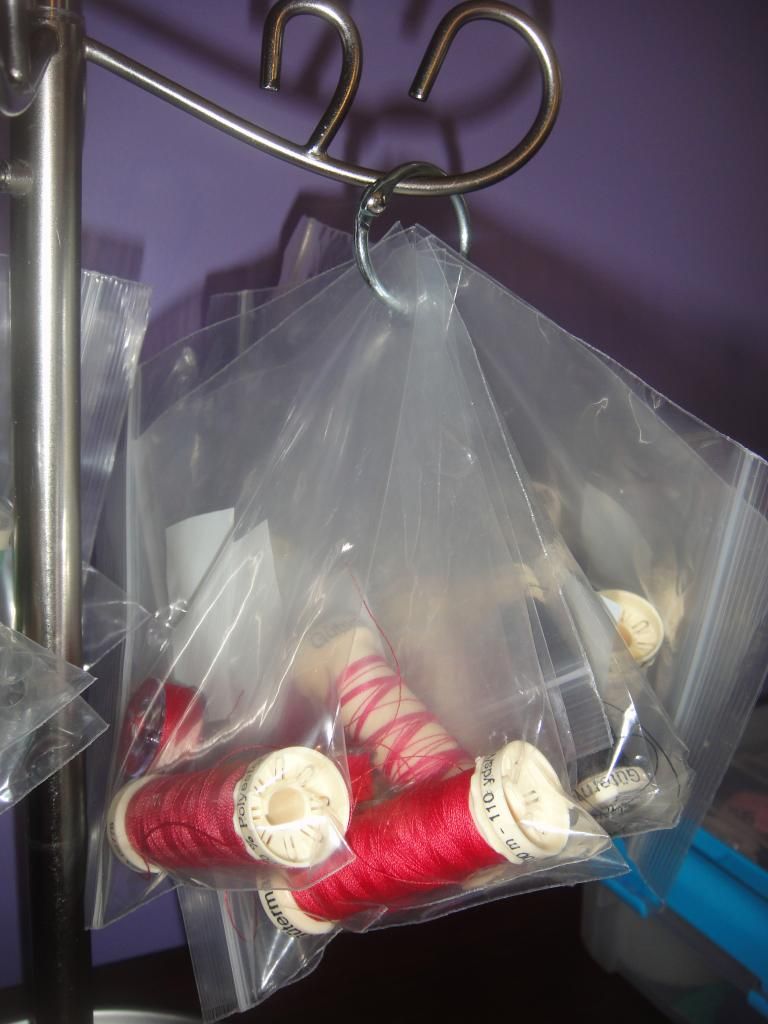
My question set my mother to thinking, though, and she came up with a wonderful solution. She gave me a supply of plastic bags intended for embroidery floss, each one with a hole punched in the corner. She also gave me some binder rings. She reasoned that I could store the bobbin and spool of each color in a separate plastic bag, and keep them all together with the binder ring.
Brilliant!
And, if I do say so myself, I took it one step further in brilliance by finding a necklace holder to keep the bags at the ready next to my sewing machine.
(Other possibilities to do this job: banana holders--crazy things!--and coffee mug holders.)
The other thing that baffles my mind about the thread I use is that each spool has a sticker on the end of it with a number that identifes the color. When I insert it into my machine, a hole is poked through the sticker, and it is often impossible to read the number. When the time comes to replace the color, I have to guess which exact shade I had been using. Craziness!
With these plastic bags, I will be able to use a permanent marker to write the number on the bag as soon as I put the spool and bobbin inside, and there will be no more mysteries when it comes time to replace a color.
I can't even tell you how much pleasure my little thread organizer brings me when I walk into my craft room or sit down at my sewing machine for a project.
Many thanks to my mom for her continued organizing brilliance!
If you don't use a sewing machine, you may not realize that stitches are made through the combined contributions of thread from a spool and a bobbin. It blew my mind that there was no storage box that kept spools and bobbins of the same color next to one another.
If I used several shades of blue, for example, I had to be very careful that I didn't mix one shade of blue on a spool with another shade of blue on a bobbin. There are storage boxes for spools and storage boxes for bobbins, but not storage boxes to keep spools and bobbins together!
I asked my mother, who has sewed for a lifetime, as well as the woman at the store where my mother purchased my sewing machine to make sure I wasn't crazy, and they both confirmed that no such storage box exists.
My question set my mother to thinking, though, and she came up with a wonderful solution. She gave me a supply of plastic bags intended for embroidery floss, each one with a hole punched in the corner. She also gave me some binder rings. She reasoned that I could store the bobbin and spool of each color in a separate plastic bag, and keep them all together with the binder ring.
Brilliant!
And, if I do say so myself, I took it one step further in brilliance by finding a necklace holder to keep the bags at the ready next to my sewing machine.
(Other possibilities to do this job: banana holders--crazy things!--and coffee mug holders.)
The other thing that baffles my mind about the thread I use is that each spool has a sticker on the end of it with a number that identifes the color. When I insert it into my machine, a hole is poked through the sticker, and it is often impossible to read the number. When the time comes to replace the color, I have to guess which exact shade I had been using. Craziness!
With these plastic bags, I will be able to use a permanent marker to write the number on the bag as soon as I put the spool and bobbin inside, and there will be no more mysteries when it comes time to replace a color.
I can't even tell you how much pleasure my little thread organizer brings me when I walk into my craft room or sit down at my sewing machine for a project.
Many thanks to my mom for her continued organizing brilliance!
Sunday, May 27, 2012
Paint Chip Pockets
In the May 2012 Country Living magazine, the Idea Notebook suggests stitching those free paint chips from the hardware store on three sides to create pockets that can be tacked onto bulletin boards for clever organization.
I just happened to have a number of those paint swatch cards in my craft stash, and--as you know--I love stitching paper, so I couldn't resist giving this simple craft a try:
I'm not sure how practical they are as bulletin board organizers; let's just say they don't hold a whole lot. I didn't have an available cork board handy to test them, so I photographed mine laying on the work table. They look pretty nifty, don't you think?
It occurred to me as I was making them, though, that they would make awesome little pockets for art journal pages.
There really isn't anything complicated about making these little pockets. You just stack two cards of the same size together with the right sides facing out, then stitch along the bottom and sides with contrasting thread. And you can give all your sewing machine's fancy stitches a try while you are at it!
Enjoy an artful Memorial Day holiday!
I just happened to have a number of those paint swatch cards in my craft stash, and--as you know--I love stitching paper, so I couldn't resist giving this simple craft a try:
I'm not sure how practical they are as bulletin board organizers; let's just say they don't hold a whole lot. I didn't have an available cork board handy to test them, so I photographed mine laying on the work table. They look pretty nifty, don't you think?
It occurred to me as I was making them, though, that they would make awesome little pockets for art journal pages.
There really isn't anything complicated about making these little pockets. You just stack two cards of the same size together with the right sides facing out, then stitch along the bottom and sides with contrasting thread. And you can give all your sewing machine's fancy stitches a try while you are at it!
Enjoy an artful Memorial Day holiday!
Labels:
art journal,
art supplies,
how-to,
magazine inspiration,
organizing,
paper crafting,
sewing
Friday, January 13, 2012
A Nod to Organization
This week, Julie Balzer has been featuring blog posts about organizing art and crafting spaces. She has shared her strategies, featured guest posters, and offered some questions and assignments to get the rest of us thinking about our own systems.
I shared a few of my organizational strategies when I blogged about my new craft room, dubbed Studio 791.
My latest "nod to organization" is a decorated box to use for storing my slowly but steadily growing collection of decorative tapes.
Did you see the awesome boxes Anthropologie was giving out during Christmas 2010? Well, it only took me a year to finally do what I intended to do the moment I laid eyes on that box: I made an artful playdate out of embellishing the heck out of it, with paints, rub-ons, image transfers, catalog images, postcards, and tapes.
I will be the first to admit that it turned out a bit "busy," but it's fun and colorful, and covered in interesting things to look at, so it makes an artful addition to my creative workspace.
And it offers me plenty of tape storage:
At least for now!
Here's hoping that your Friday the 13th didn't live up to the hype! Have a blessed and creative weekend.
I shared a few of my organizational strategies when I blogged about my new craft room, dubbed Studio 791.
My latest "nod to organization" is a decorated box to use for storing my slowly but steadily growing collection of decorative tapes.
Did you see the awesome boxes Anthropologie was giving out during Christmas 2010? Well, it only took me a year to finally do what I intended to do the moment I laid eyes on that box: I made an artful playdate out of embellishing the heck out of it, with paints, rub-ons, image transfers, catalog images, postcards, and tapes.
I will be the first to admit that it turned out a bit "busy," but it's fun and colorful, and covered in interesting things to look at, so it makes an artful addition to my creative workspace.
And it offers me plenty of tape storage:
At least for now!
Here's hoping that your Friday the 13th didn't live up to the hype! Have a blessed and creative weekend.
Friday, November 4, 2011
Studio 791 Tour
Studio 791 has found a home!
When my younger daughter was born in early 2009, I gave over my dedicated art-making space to be a nursery. My work table, books, notebooks, boxes, papers, files, pens, paints, totes, brushes, ribbons, buttons, glues, stamps, punches, ink pads, scissors, and all the rest found an uneasy home in the playroom/living room downstairs.
With the addition of a sewing machine, my workspace expanded into the dining room.
As itinerant as it made me feel, the one truly driven nuts by the crafting overflow situation was my husband!
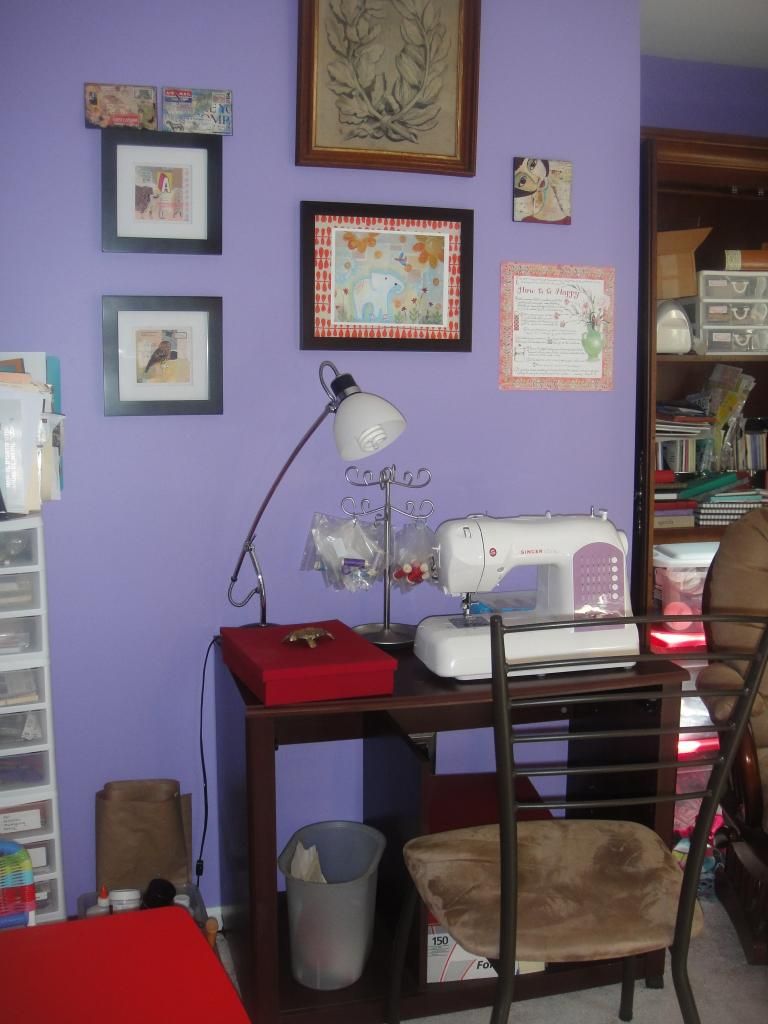
When our girls decided they wanted to share a room, we jumped at the chance. It was a win/win/win--they got to share a room (and act like banshees every night at bedtime), I got my craft room back, and my husband got my crafts out of his constant line of sight!
It was so "meant to be" that it only took a few hours to get everything back upstairs and into place two Saturdays ago.
In the back corner of the closet, I tucked a two-shelf bookcase on wheels to hold all of the books I use for collage and art journaling elements--nursery rhyme books, foreign language texts, art books, dictionaries, that sort of thing. The two storage cubes also have all sorts of ephemera--papers, filed magazine images, stamps, tickets and postcards, etc.
The top shelf of the closet holds labeled shoe boxes of embossing materials, punches, tags, adhesives, stencils, and Scrabble tiles. The next shelf down holds my rubber stamp collection, organized into labeled acrylic photo frames:
The shelf under that has ink pads and seriously small bits and pieces (beads, game pieces, etc.). And the shelf under that has my painting supplies. On the floor I have a crate, filled with jumbo Ziploc bags holding all my paper scraps in rough color groupings (blue and purple; orange and red; yellow; green; white and cream; brown, black and vintage):
A tower of drawers holds my scrapbooking papers, used for all kinds of projects, along with drawers for cards, scissors, pens, and "miscellaneous". (You can categorize all year, and I swear you'll always end up with a "miscellaneous" drawer or two!)
There is an enormous armoire tucked in a back alcove corner of the room, and it provides me another great source of storage, with doors that can shut away the inside from view. Right now it holds mainly sewing supplies and magazine archives.
I let my four-year-old take a picture of me in my new digs. By the look of the outfit I have on, it's a good thing it's blurry! But I think you can still see how gloriously relaxed I look to sit back in my own personal art space.
I leave you with a couple cute pics of my "studio mascots":
Enjoy a happy, healthy, creative weekend!
When my younger daughter was born in early 2009, I gave over my dedicated art-making space to be a nursery. My work table, books, notebooks, boxes, papers, files, pens, paints, totes, brushes, ribbons, buttons, glues, stamps, punches, ink pads, scissors, and all the rest found an uneasy home in the playroom/living room downstairs.
With the addition of a sewing machine, my workspace expanded into the dining room.
As itinerant as it made me feel, the one truly driven nuts by the crafting overflow situation was my husband!
When our girls decided they wanted to share a room, we jumped at the chance. It was a win/win/win--they got to share a room (and act like banshees every night at bedtime), I got my craft room back, and my husband got my crafts out of his constant line of sight!
It was so "meant to be" that it only took a few hours to get everything back upstairs and into place two Saturdays ago.
For me, it is a creative haven of art-making bliss!
The two little urchins are never far away!
The opposite corner of the room has the closet (doors removed), which gives me most of my storage space, and my computer cart-turned-sewing table. You can see my tote bag at the ready by the door, containing basic supplies (mostly for art journaling) to carry between the upstairs and downstairs.In the back corner of the closet, I tucked a two-shelf bookcase on wheels to hold all of the books I use for collage and art journaling elements--nursery rhyme books, foreign language texts, art books, dictionaries, that sort of thing. The two storage cubes also have all sorts of ephemera--papers, filed magazine images, stamps, tickets and postcards, etc.
The top shelf of the closet holds labeled shoe boxes of embossing materials, punches, tags, adhesives, stencils, and Scrabble tiles. The next shelf down holds my rubber stamp collection, organized into labeled acrylic photo frames:
The shelf under that has ink pads and seriously small bits and pieces (beads, game pieces, etc.). And the shelf under that has my painting supplies. On the floor I have a crate, filled with jumbo Ziploc bags holding all my paper scraps in rough color groupings (blue and purple; orange and red; yellow; green; white and cream; brown, black and vintage):
A tower of drawers holds my scrapbooking papers, used for all kinds of projects, along with drawers for cards, scissors, pens, and "miscellaneous". (You can categorize all year, and I swear you'll always end up with a "miscellaneous" drawer or two!)
There is an enormous armoire tucked in a back alcove corner of the room, and it provides me another great source of storage, with doors that can shut away the inside from view. Right now it holds mainly sewing supplies and magazine archives.
I let my four-year-old take a picture of me in my new digs. By the look of the outfit I have on, it's a good thing it's blurry! But I think you can still see how gloriously relaxed I look to sit back in my own personal art space.
I leave you with a couple cute pics of my "studio mascots":
Bayla, age 2-1/2
Katy, turning 4 next week
Enjoy a happy, healthy, creative weekend!
Subscribe to:
Posts (Atom)