Saturday, June 25, 2011

Easy Image Transfers

I have been fascinated by image transfers for a very long time. They allow for the most beautiful layering, providing a ghost-like image on the surface with any number of interesting patterns, texts, or designs showing through from beneath.
{recent journal page using two image transfers}

I read about them for at least a year before trying one, daunted by such “specialized” tools as toner-based photocopy machines, heating tools, blender pens, and water slide decal paper.

One of the earliest methods I tried used clear packing tape, and while it was super-simple, I felt really limited by the narrowness of the tape, and I wasn’t a fan of a vintage-looking transferred image with a high-gloss surface.

And then I discovered clear contact paper.

The image transfer technique I am describing here is probably covered in any book that talks about image transfer, so it is definitely not something I came up with. But I’ll share how I do it, because I think it is so incredibly fast and easy, and has surprisingly good results.

To make an image transfer with clear contact paper, choose whatever images you want to transfer. I have always used pictures from magazines and catalogs.

You will also need clear contact paper (which can be found at your local Target or Target-like store, where they sell shelf paper), scissors, and a bone folder (though really you can just use the handle end of your scissors in place of this tool).
{My husband asked me incredulously, "What are you taking a picture of???"}

All you have to do is take the backing off the contact paper, and place the pictures you want to transfer face-down onto the adhesive side of the contact paper. You use the bone folder (or scissor handles) to rub, rub, rub (also called “burnishing”) against the back of the picture. I probably rub more than is strictly necessary, but I like my results, so I stick with it.
{Notice that these are the BACKS of the images I want to transfer.}

Then you drop the pictures (now attached to the sticky contact paper) into a dish pan of water. (I cut each image apart, just so it fits in the pan better.)  I just turn on the faucet and pour it in, without any concern for temperature.
{I usually put in three or four to soak at a time.}

Let the pictures sit for a couple of minutes. Seriously, I am an impatient crafter; I’ve let them sit for maybe one or two minutes, and it has been enough to make a great transfer.

After a couple of minutes, take a picture out and rub your finger against the paper side, peeling away at the layers of paper.
The image has adhered to the sticky side of the contact paper; you’re just trying to remove all the remaining paper pulp.
Don’t get impatient and use your fingernail, or the image will scratch away too (unless, of course, you are going for some sort of scratched effect for your transfer!).  Sometimes I hold them under a running faucet to take the paper off.

Then you just lay them out to dry on wax paper.

You can see some white areas on these transfers; those are places where a little more paper pulp remains. I just run them under the faucet and rub a little bit more. Oftentimes, it’s so little that you will find that it doesn’t take away from the “look” of your transfer once you layer it onto your work.

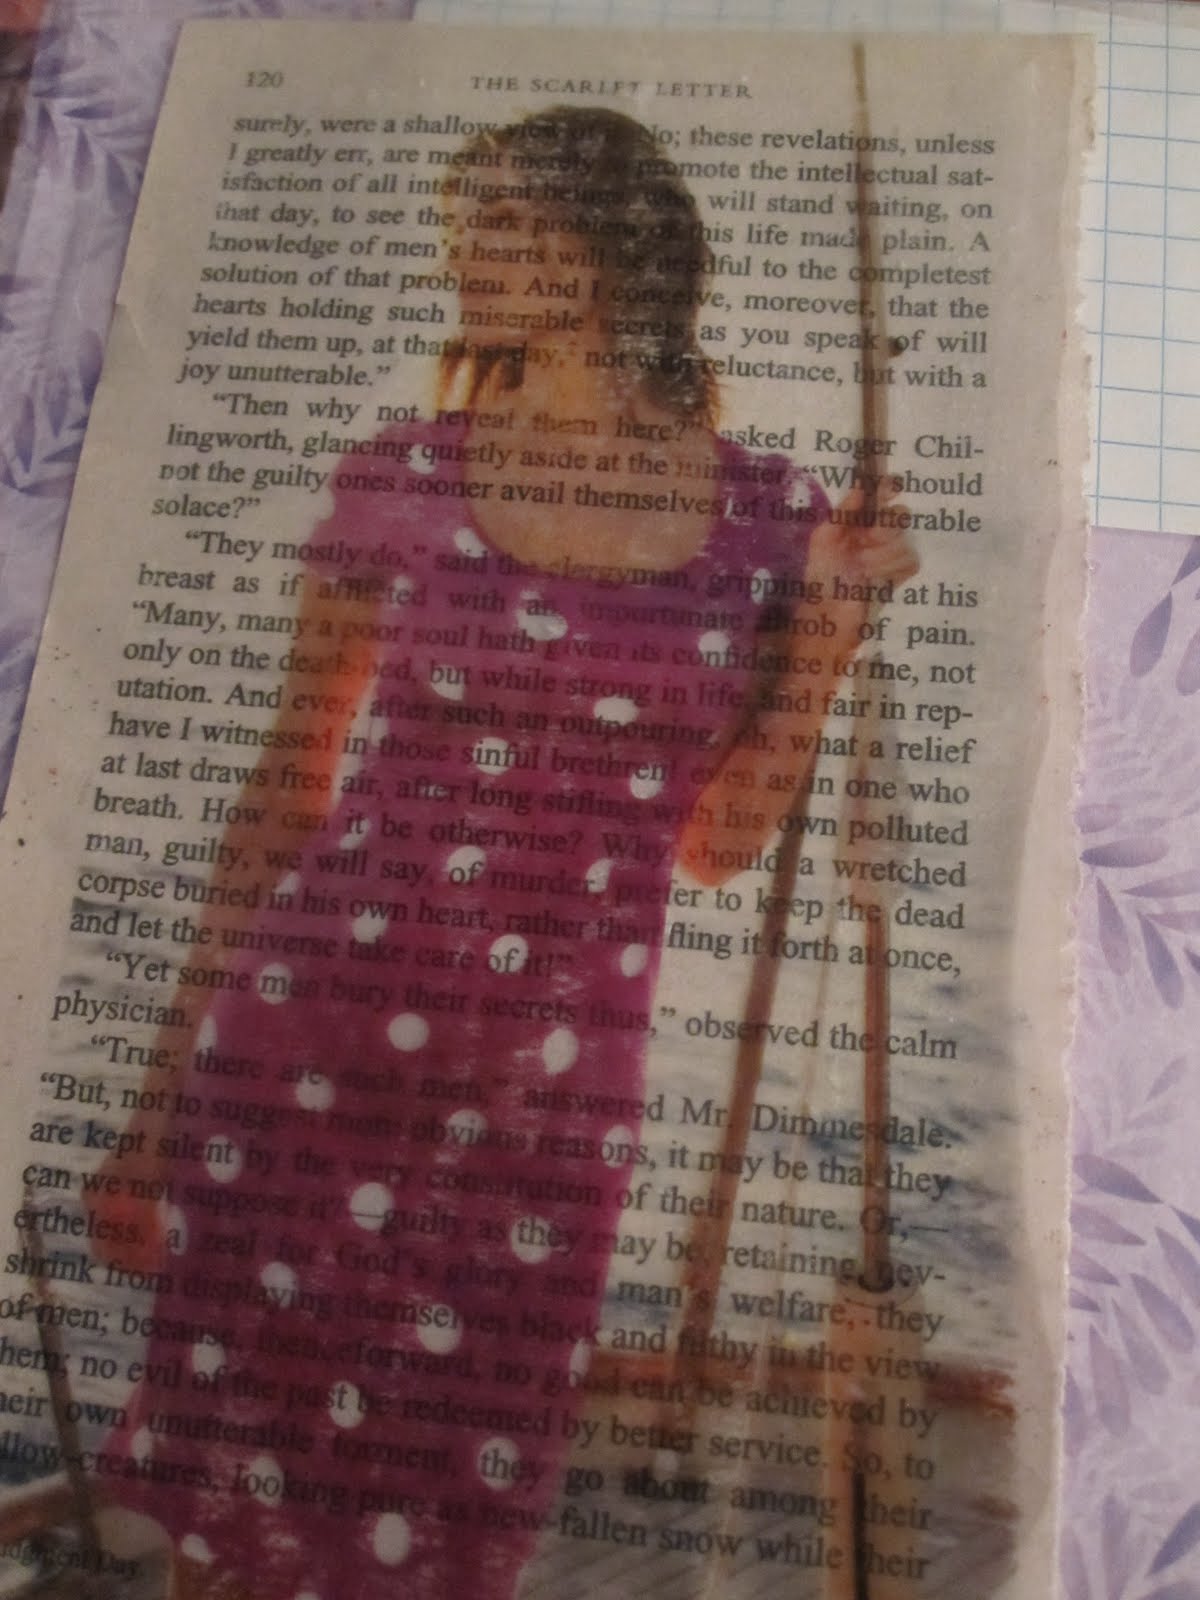
I just did these transfers about 30 minutes before writing this post, so I haven’t used them in any work yet. But I’ve put them on top of some different papers—text, graph, decorative—so you can get an idea of the effect.

To do a single image transfer takes ten minutes at the most. To me, the impatient creator, this is far preferable to techniques that require, say, multiple coats of gel medium with time to dry between each layer. Tedious!

The only “specialized” equipment you need is contact paper, and that’s readily available. The results are pretty great!

Just remember to store your image transfers on wax paper until you are ready to use them. They’ll stick to regular paper, and pull off additional pulp if you try to take them off to use somewhere else.

Have fun with these! They are an amazing addition to art journal pages and other projects.

********
There is a good chance that I won't be posting to my blog next week, because I will be teaching a class that will keep me super-busy most of the day.  Many of you are employees/moms/artists/bloggers all at the same time, but I'm not used to that kind of workload!  During my one-week of the year as a working mom, I 'm not sure I'll be able to give much time to my art or my blog.  But I'll be back the following week! 

Wednesday, June 22, 2011

WOYWW: PiF and More!

Just hours after I posted my workspace last Wednesday, I received my PiF in the mail from Maggie (aka, SilverCrafter) of Worcestershire, England. She sent me ten beautiful notecards, which will clearly remind me of our participation in WOYWW with Julia at Stamping Ground:
Here is a close-up of one of the cards:
Maggie explained in her letter that the cards were inspired by the stamps of Barbara Gray of Clarity Stamps, and that some of her stamps were used, too.

Along with the cards came what she called in her letter “one or two odd bits of other artwork”. But there were more than one or two goodies included for me to play with!
Though they are all lovely, this one is my favorite:
A big thank you to Maggie for participating in the Anniversary PiF event, and sending me such a lovely gift!

********
You can actually see the top of my desk today, which was the result of a few minutes clearing and moving before taking the photo. (We aren’t supposed to do that, are we?)

Though it is probably too small to see in this picture, on the left side of my desk are two library books: The No Cry Potty Training Solution and Potty Training for Dummies. I potty-trained my older daughter last summer, and this summer, in about a week and a half, it is my younger daughter’s turn to learn the wonders of modern plumbing. Wish me luck! Actually, just wish me patience. I was not at my best when I tried to do this the last time around!
In the center of the table are some cake and cupcake tags I made using The Pink Couch’s tutorial. If you missed my last blog post, I was agonizing over the ethics of using projects created by following online tutorials. I don’t know where these particular tags are headed, but I had fun creating additional, smaller-sized cakes and cupcakes that could fit on shipping-size tags made from white card stock. I even painted reinforcement labels in coordinating colors, and then went a little nuts with ribbons, lace, and fibers.

********

I will not be participating in WOYWW next week, as I will be teaching a week-long class to teachers of grades K to 8 on the topic of Managing a Writing/Reading Classroom.  The class is a graduate course offering through the Pennsylvania Writing and Literature Project.  It is the only week out of the year where I am a working mom instead of a stay-at-home mom, so pretty much everything else is going to be put on hold during the week!

********
For more workspace fun, check out Julia’s Stamping Ground site for a list of other WOYWW participants!

Have an art-full Wednesday!

Friday, June 17, 2011

Cake, Ice Cream, and Ethics

Back in February, I ran across a tutorial for making the most adorable paper cakes and cupcakes on Tara Anderson’s blog, The Pink Couch. I printed it out, and put it in my “Must Do” pile (as if I have something as organized as that on my desk!). Tara has it listed under “For Kids,” which I guess says something about me!
I am trying very hard to eliminate that theoretical “Must Do” pile, in favor of lovely, completed projects, so this past week, I pulled out Tara’s tutorial, along with a big pile of paper scraps, and started making the most colorful, fun cakes and cupcakes based on her design.
There have been many, many blog posts recently regarding ethical issues surrounding the use of other people’s designs and ideas. For example, I have read the thoughts of Quinn at Quinn Creative and Chris at Parabolic Muse. Reading these posts, and completing this little cake and cupcake project has led me to pose the following multi-part question. I would really love to hear your thoughts!

My question:

Is it ethically allowable for me to:

A. Use these cakes and cupcakes (based on Tara’s tutorial) to make a card for my mother or create a gift tag for my daughter’s birthday package?

B. Use these cakes and cupcakes (based on Tara’s tutorial) to create a set of greeting cards to give to my mother as a birthday gift, so that she can send them out to HER friends and family?

C. Use these cakes and cupcakes (based on Tara’s tutorial) to create sets of greeting cards and gift tags to sell at a church craft sale?
Because I wasn’t sure if using the idea of cakes and cupcakes from Tara’s design to use for gifts or for sale was a breach of ethics, I thought I could safely take the idea of paper piecing (as it is a fairly universal technique, I think), and apply it to a different design. The idea I had in my head was of an ice cream cone.

But then I read a post by my “bloggy friend” Janet over at Just Me and My Art, and she had a lovely journal page on which she had created an ice cream cone, very similar to the idea I had in the wake of making paper cakes and cupcakes.

Uh-oh, I thought. Does this mean that ice cream cones are now off-limits, as well? For the sake of posing my question (and because I wanted to craft some cones!), I made these little projects:

My multi-part question is thus the same:

Is it ethically allowable for me to:

A. Use these ice cream cones (even though Janet had something similar in her journal) to make a card for my mother or create a gift tag for my daughter’s birthday package?

B. Use these ice cream cones (again, reflecting Janet’s journal page) to create a set of greeting cards to give to my mother as a birthday gift, so that she can send them out to HER friends and family?

C. Use these ice cream cones (similar to Janet’s journal page) to create sets of greeting cards and gift tags to sell at a church craft sale?
Because I wasn’t sure about whether ice cream cones would now present a breach of ethics, I sat down today and created a design out of my head that I have not yet seen anywhere (though it WAS inspired by the T-shirt a little girl was wearing in our music class yesterday morning)—a bright and fruity summertime drink, complete with fruit slice and straw.
However, I am starting to think there is nothing new under the sun, and it is entirely possible that a search of the Internet could turn up another artist/crafter who has worked with a similar design. Am I responsible for determining whether it’s been “done” before, before I can use these smoothie drinks as a gifts or for sale?

I know it SEEMS like the ethics surrounding others' art and crafts should be simple and straightforward, but I am finding that I still have some questions. I hope, hope, hope that if you take the time to read this post, you will leave a comment to share your thoughts on the specific questions I have posed.

Thank you for helping me sort out cake, ice cream, and ethics!

Wednesday, June 15, 2011

WOYWW: Magazine Love

So here is my desk this Wednesday morning. Quite a mess…not sure I can even see to the bottom of all the papers I have spread around. I have a paper crafting project underway, which I’ll blog about when I’m a little further along.
{My inspiration board is still up there inspiring me!
I haven’t changed it in any way;
it looks so pretty to me as it is.}

To see other Wednesday workspaces, check out Julia's Stamping Ground blog!
**********
Have you seen this new magazine, Mollie Makes?
I figured that my UK friends who participate in WOYWW might have seen it, since it’s published over that way. It costs $12 in the U.S. (!), but I used a 50% off coupon at JoAnn to bring it down to a more reasonable $6.

It even comes with a nifty free craft in an envelope attached to the front cover. For this first issue, they’ve included felt pieces and a button to craft a smartphone case.
The magazine’s subtitle is “Living and Loving Handmade,” and it focuses on “making, thrifting, collecting, crafting.” They obviously have ME in mind as their focus audience!

Of course, living all the way over in the United States, there’s no way for me to go to great places like Drink, Shop & Do in Kings Cross, London, or Handmade Kenilworth in Warwickshire. But I can live vicariously through the magazine articles and yummy photos, and I’ll have a readymade “To Do” list the next time I do some international travel!

If you check out the magazine, you can learn to make crocheted apple jackets (featured on the cover), which are so deliciously impractical and cute. Other projects include fabric garlands, aprons, Peter Pan collars, felt Chihuahuas, paper mobiles, and fabric eggs. Sounds like fun, doesn’t it?

And besides the crafts, Mollie Makes features some beautiful homes decorated in the most lovely, handcrafted style.

It costs almost $100 for a magazine subscription in the States, so THAT won’t be happening, but I will definitely pick up future issues when I have a coupon in hand!

**********

Finally, I wanted to share a fun little craft I read about and tried yesterday afternoon. I was at the pharmacy, and browsed through Fresh Style magazine. One of the featured crafts turns a wine cork into a little card display.
{Featuring a lovely postcard by April Cole!}

All you have to do is cut a groove along the side of the cork, from the outer edge to the center. Then you can use a ball-head pin to balance the cork in back.

Presto! You have a cute little card display for postcards or ATCs.

Happy, creative Wednesday to you!

Sunday, June 12, 2011

Playing With Books

Last month I mentioned that I was playing with books, thanks to the book by the same name by Jason Thompson. Completing the projects in this book requires plenty of cutting, tearing, and disemboweling poor, unloved books that have been discarded, thus bringing them new life in a different form.

One of the first projects I completed was a business card holder.
Basically all you have to do is remove the front and back covers from a paperback book, and then fold every page in half. There’s some nice, mindless therapy to this task!

I like the look of the folded pages, but I’m not particularly impressed with its usefulness as a business card (or any other type of card) holder. I thought it might be a fun way to display some of the beautiful postcards from recent swaps, but you can’t put any in front of the halfway point, or they dangle forward in a way that prevents you from seeing the front of them. I almost think it works best as a piece of “book sculpture.”

Being the postcard fan that I am, I loved this next simple project I completed:
All you do is remove interesting covers from old paperback books, cut them to postcard size (4”x6” is pretty standard), and adhere a postcard back to them where you can write the message and affix the stamp.

One place on the internet said that you cannot send postcards with rounded corners in the USPS, but the woman at our post office didn’t seem to know what I was talking about when I asked her about it.

My most recent favorite project was the book blossoms.
I used a small strip of text, cut lines along one edge (the book suggests five slits to create six petals, but I was more happy when I cut closer to twelve for LOTS of petals!), and rounded the edges. A little pink chalk ink pad adds colors to the petals.
My next step was to wrap the strip of text around an actual twig from the backyard, and then hold it in place with some wire wrapped at the base. The only trick here is to avoid snapping the twig, while still wrapping the wire tightly enough.

I thought at first that this project wasn’t going to look like much, but when I finished the flowers and put them in some bottles that I had decorated with vintage papers and stamps, I really liked the look. I ended up sending one to Sylvia for the Stamping Ground PiF two weeks ago.

I’ve always failed miserably when I’ve tried origami. For the life of me, I have never been able to follow those pictures of folds to create anything that looks like anything. Thompson’s book has a dimensional circle ornament that isn't exactly origami, but I thought maybe I would finally be able to complete a paper-folding project.
I thought wrong. I will try again, as I only tried once, but as usual, I had trouble following the directions.

Besides the circles for this last project, I cut a bunch of butterflies, which I used for cards and sewing machine practice.

I then used some of them for Mollie C. Greene’s Immobile Mobile project in Thompson’s book.
She suggests using the little butterflies on a wire to decorate cakes and cupcakes, or to further beautify flowers in a bouquet. I again used them in my decorative bottles (some on wire, some on twigs), but I could also see making some sort of a polymer clay base to make a decorative piece.

I have started the book jacket billfold project; I have the book cover laminated on cardstock and ready to fold and sew.

And then there’s the book page tote.

And the paper beads.

And the pocket book (I already have a copy of Black Beauty picked out for that one!).

Playing With Books is likely to keep me busy for quite some time!

Thursday, June 9, 2011

Journaling In the Sun

I have joined up with scores of other art journalers to participate in Natalie Malik’s free online art journaling class called “In the Sun.” We started this adventure on Monday, and have been receiving daily prompts to get our summer art journals going.
{Introduction page}

I decided to participate to see how I would manage responding to specific prompts related to topics and techniques, and also to be a part of the community of participants. So far, it’s been a lot of fun!
{Second Introduction Page}

This journal for me is going to be “simple,” by which I mean clean lines, minimal pages requiring paint drying time, quick execution. For the most part, a page has taken me 15 or 20 minutes, from reading the prompt, to selecting my images, to creating the page. It feels so freeing not to labor for hours on different days just to see a journal page to completion!

I have admired how Natty uses magazine images on her journal pages, as well as washi tapes, so that too is going to be a goal and focus for me in this book.
{Self-portrait page:  Photo of myself from Pogo
printer, adhered to catalog image!}

I am using a 6”x8” Strathmore drawing notebook, and it has proven to be the perfect size to accommodate the images I have wanted to use, while not requiring as much time to fill the page.
{Technique page:  Tissue paper and gel medium.  Ooh, I resisted this one. 
I have a hate/hate relationship with gel medium and its wrinkles. 
But I actually had fun laying down the tissue paper layers, and saying,
"Hey, I have to do this.  It's my ASSIGNMENT.  Embrace the wrinkles. 
Call them texture.  Prentend you MEANT to do that!"}

{Here are some things I want my summer to be full of.
I found this amazing photo in a catalog, added the masking paper strips
and wrote down some of my ideas for the summer. 
I love how simple it was to put together!}

For two or three days, I kept running around collecting the very same supplies to do my pages.  So I got smart, and collected them all in a tote bag from Michaels.  Now I can grab the bag, check the computer for the prompt, and make the page at the breakfast table while my girls are watching a morning cartoon. 
{Supplies at the ready}

It’s not too late to get started! We are only one week in… If you want to participate, check out the In the Sun web site to see all the prompts.

You can see the participants’ journal pages on Flickr!

Also check out Natty’s creative blog, Awkward and Beautiful (one of the BEST blog names I’ve seen!).

Wednesday, June 8, 2011

WOYWW: A New Addition!

I have a new addition to my workspace to share today:
{Inspiration Board}

The picture that used to hang above my crafting table gave a beautiful window effect, making me feel as though I was looking out through the trees onto a tranquil lake surrounded by mountains. But I’m loving my inspiration board even more! We moved the picture to the family room, and I am using this bulletin board (a fairly inexpensive find from Target) to display some favorite papers, as well as postcards from the two swaps I have done.
Most of the postcards are clipped with clothespins to string that I pilfered from my husband’s workbench and stapled to the top corners of the board.

Here’s the overall workspace effect:
{As with so many things, I think it looks
a lot better in person than in the photo!}

As you can see, my desk continues to overflow with piles, so much so that I have moved some of my art journaling supplies (paints, ink pads, paint brushes) to the dining room table.

My husband says that I now have a “Craft Room: East Wing” and “Craft Room: West Wing.” He’s only moderately amused!

The other night he was fixing dinner for the kids, and I had a moment to steal away to the West Wing (that is, the dining room) with a little summer cerveza to work on a journal page:
Ahh, this is the life!

P.S.:  Last week, I shared with you my latest purchase from Michael's, the revolving organizer.  On Monday, I spent some time at Borders, flipping through a magazine called "Creative Spaces," a special issue put out by Creating Keepsakes.  Eight (count 'em, EIGHT) of the crafting spaces they featured had some version of that organizer!  One woman had THREE of them!  I thought you might get as big a kick out of that as I did!

To see other Wednesday workspaces, take a look at the list of participants at Julia's Stamping Ground.  Happy snooping!