
{recent journal page using two image transfers}
I read about them for at least a year before trying one, daunted by such “specialized” tools as toner-based photocopy machines, heating tools, blender pens, and water slide decal paper.
One of the earliest methods I tried used clear packing tape, and while it was super-simple, I felt really limited by the narrowness of the tape, and I wasn’t a fan of a vintage-looking transferred image with a high-gloss surface.
And then I discovered clear contact paper.
The image transfer technique I am describing here is probably covered in any book that talks about image transfer, so it is definitely not something I came up with. But I’ll share how I do it, because I think it is so incredibly fast and easy, and has surprisingly good results.
To make an image transfer with clear contact paper, choose whatever images you want to transfer. I have always used pictures from magazines and catalogs.

You will also need clear contact paper (which can be found at your local Target or Target-like store, where they sell shelf paper), scissors, and a bone folder (though really you can just use the handle end of your scissors in place of this tool).

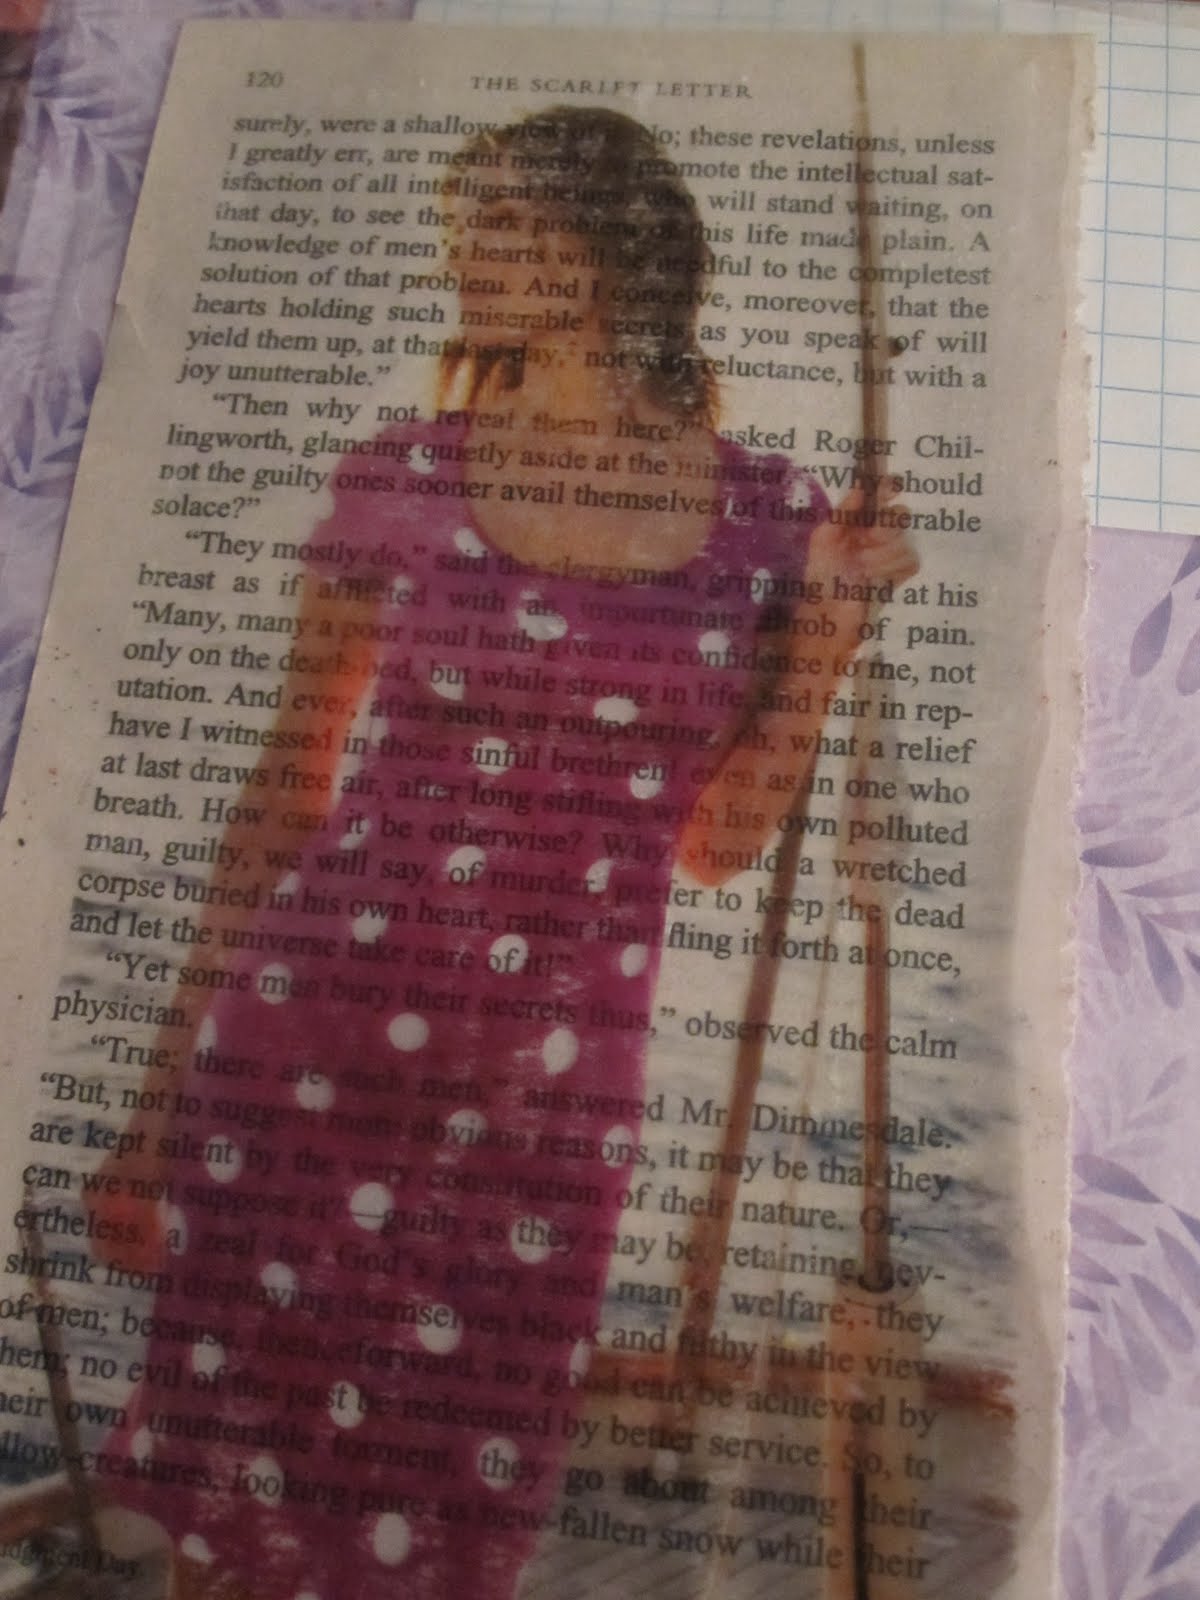
{My husband asked me incredulously, "What are you taking a picture of???"}
All you have to do is take the backing off the contact paper, and place the pictures you want to transfer face-down onto the adhesive side of the contact paper. You use the bone folder (or scissor handles) to rub, rub, rub (also called “burnishing”) against the back of the picture. I probably rub more than is strictly necessary, but I like my results, so I stick with it.

{Notice that these are the BACKS of the images I want to transfer.}
Then you drop the pictures (now attached to the sticky contact paper) into a dish pan of water. (I cut each image apart, just so it fits in the pan better.) I just turn on the faucet and pour it in, without any concern for temperature.

{I usually put in three or four to soak at a time.}
Let the pictures sit for a couple of minutes. Seriously, I am an impatient crafter; I’ve let them sit for maybe one or two minutes, and it has been enough to make a great transfer.
After a couple of minutes, take a picture out and rub your finger against the paper side, peeling away at the layers of paper.


Then you just lay them out to dry on wax paper.
 You can see some white areas on these transfers; those are places where a little more paper pulp remains. I just run them under the faucet and rub a little bit more. Oftentimes, it’s so little that you will find that it doesn’t take away from the “look” of your transfer once you layer it onto your work.
I just did these transfers about 30 minutes before writing this post, so I haven’t used them in any work yet. But I’ve put them on top of some different papers—text, graph, decorative—so you can get an idea of the effect.


To do a single image transfer takes ten minutes at the most. To me, the impatient creator, this is far preferable to techniques that require, say, multiple coats of gel medium with time to dry between each layer. Tedious!
The only “specialized” equipment you need is contact paper, and that’s readily available. The results are pretty great!
Just remember to store your image transfers on wax paper until you are ready to use them. They’ll stick to regular paper, and pull off additional pulp if you try to take them off to use somewhere else.
Have fun with these! They are an amazing addition to art journal pages and other projects.
********
There is a good chance that I won't be posting to my blog next week, because I will be teaching a class that will keep me super-busy most of the day. Many of you are employees/moms/artists/bloggers all at the same time, but I'm not used to that kind of workload! During my one-week of the year as a working mom, I 'm not sure I'll be able to give much time to my art or my blog. But I'll be back the following week!
28 comments:
Thanks for this easy transfer technique. I've never done much with transfers for the same reason you said....too many special things needed and the few times I used gel medium it didn't work for me. But this looks like something I can do! I'm getting some contact paper tomorrow and giving this a try.
Thank you for this. I can't recall ever hearing about the contact paper image transfer. I love it!!!! Off to get some clear contact paper.
You are re-inspiring me to make some new work....I too prefer the look of contact paper vs. the packing tape...Hey I had my husband bring home weird xerox errors from his job, they were in the recycling bin...those are fun to layer as well if you want to add some abstract texture to the mix! Can't wait to see more of yours!!
This sounds like a transfer technique I can do! I'm going to have to add clear contact paper to my next shopping list. Thanks for sharing! :-)
Ooh, I think I could try that! Like Janet, haven't had any luck with gel medium and too scared to try other things lol!
Would contact paper be the stuff you use to cover schoolbooks? Sometimes the terms are different here in the UK.
Remember when we tried this on one of my visits? I loved the effect and even did a few after I got home. So-o easy ... and effective. I really liked your woman/leaf branches layout. Good luck this next week. Hope the girls do well with the child care and you have fun with your work.
This was just what I was wondering how to do!!! Thanks for the info :)
I'm glad so many of you are interested in trying this! I look forward to seeing your results.
Viv, I'm not positive that the book covers are the same thing, but I bet they are. Someone just today made a reference to "covering books with clear contact paper," so that sounds like it is! :-)
great tutorial, and really cute tags too! thanks for stopping by my blog & leaving a comment. it's so appreciated.
Awesome! I love tape transfers! Yours turned out fabulously!
I have always done packing tape transfers because of their ease but they do limit me in way. I can't wait to get clear contact paper tomorrow and transfer away!!!! THANKS for sharing.
Oh, WOW! I didn't even know there was any such thing as clear contact paper! I was also bummed about the narrowness of packing tape.
I am going to try this, you bet. Thanks for the really clear tutorial!
clear. hehee!
Love this technique, and as soon as I can purchase some of this contact paper, I'll have to give it a try! TFS! ~tina
THis is So easy and awesome too! Thanks a lot! My name is Kezia and I'm 13!
but what do you use to adhere the contact image transfer to the background? that is not mentioned? do you iron it on, glue it and if so what type of glue do you use? medium?
thanks
Kat
Appreciate the recommendation. Will try it out.
my web site ... virtual private hosting
I have been surfing online more than 4 hours today, yet I never found any interesting article
like yours. It is pretty worth enough for me. In my view, if all
webmasters and bloggers made good content as you did, the internet will be a lot more
useful than ever before.
Review my website :: laser hair removal
certainly like your website however you have to take a look at the spelling on quite a few of your posts.
Many of them are rife with spelling problems and I to find it very bothersome to tell
the truth nevertheless I will surely come back again.
My website wedding hair
Hey very nice blog!
My website: itsclip.com
Superb site you have here but I was wondering if you knew of
any community forums that cover the same topics talked about in this article?
I'd really like to be a part of community where I can get opinions from other experienced individuals that share the same interest. If you have any recommendations, please let me know. Kudos!
Also visit my blog post ... forex hedge fund
Hello every one, here every one is sharing these familiarity, therefore it's pleasant to read this blog, and I used to pay a visit this website everyday.
Also visit my homepage ... sports betting myths *http://kampuskeyfi.com/blogs/86729/133444/bets-on-sports-online*
I didn't see the answer to how to adhere the image to your project. I want to do this with my 3rd grade art class next week. Any comments?
With this type of transfer you will want to adhere it to your projects using gel medium.
I'm wondering the same thing? What do you do after the image is transferred, it's not mentioned? Did you ever get a response? I want to transfer to a t shirt.
just found this tut, yes, how do you adhere to your project once transferred?????
After you have soaked the image and rubbed away the paper, you then let it dry. To adhere it you just stick it on your item like a sticker (the contact paper is sticky). If you are ironing it o to fabric, you lay the image down where you want it, cover it with parchment paper and iron it on.
s5q99t6d03 n2u97z0w32 g3k11z5r72 x0m03p8e04 p7m70i5e21 s5k12d9k52
n5w23m2x10 u0j65o4b15 t0n37b7p79 t9i57h4q24 w5j19v5u59 m3d84t6t20
Post a Comment